

こんにちは。SCSKの江木です。
皆さん、チャットボットの質に満足していますか?
従来のルールベースのチャットボットでは、複雑な質問に対応できず、チャットボット利用者の要望を叶えることが難しかったかもしれません。
今回は複雑な質問に対応できるような、より自然で人間らしい会話を実現するため、Dialogflow CXと生成AIを連携する方法を紹介します。
Dialogflow CXとは
Dialogflow CXとは、自然言語による対話をシステムに組み込む際に使えるプラットフォームです。高度なチャットボットや音声アシスタントを構築するためのツールであり、複雑な会話の流れや多様なユーザーの質問に柔軟に対応できることが特徴です。
Dialogflow CXの基本については以下のブログにまとめているので、ご参照ください。

Dialogflow CXで生成AIを使う方法
Dialogflow CXで生成AIを使う方法を4つ紹介します。
Generatorを使う
Dialogflow CXの中にGeneratorという機能があります。Generatorは要約、パラメータ抽出、データ変換などのタスクで使われることが多いです。
今回は漢字をひらがなに変換する機能をGeneratorで実装したので、実装したAgentを紹介します。
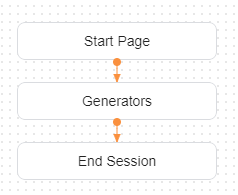
上図は実装したAgentで、Generatorsページにて、ひらがな変換を実装しています。Generatorsページの設定は以下の通りです。
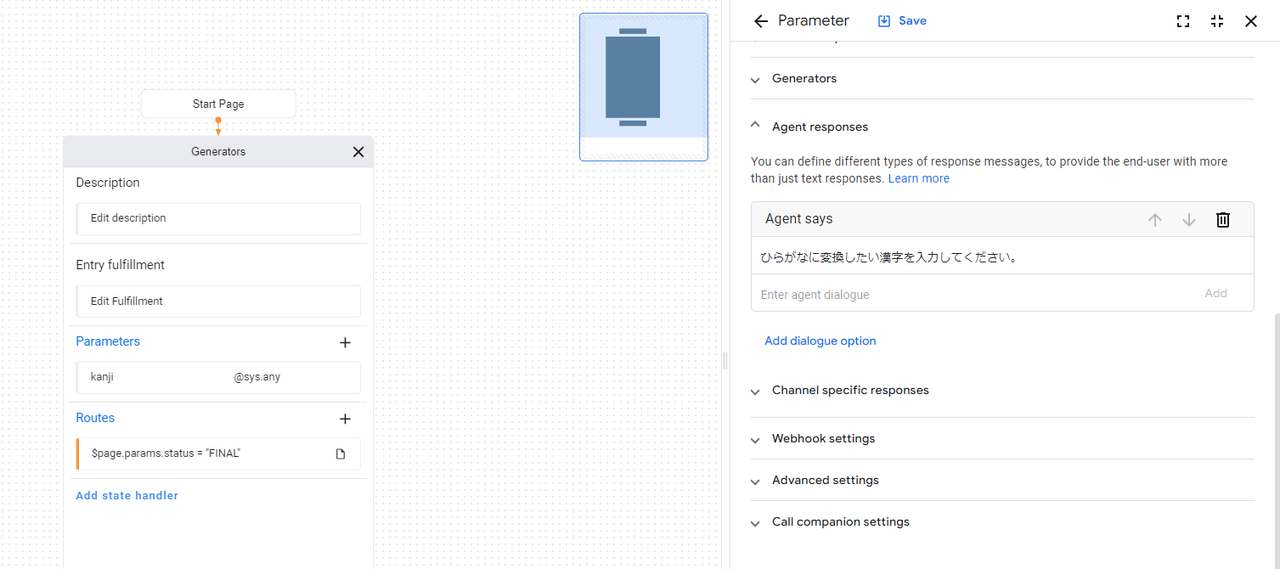
ひらがなにしたい漢字をSession Parameterで受け取るようにしています。
続いて、Generatorの設定を見ていきます。
GeneratorはSession Parameterを受け取る必要があるので、「$page.param.status = “FINAL”」ルートにて設定します。設定は以下の通りです。
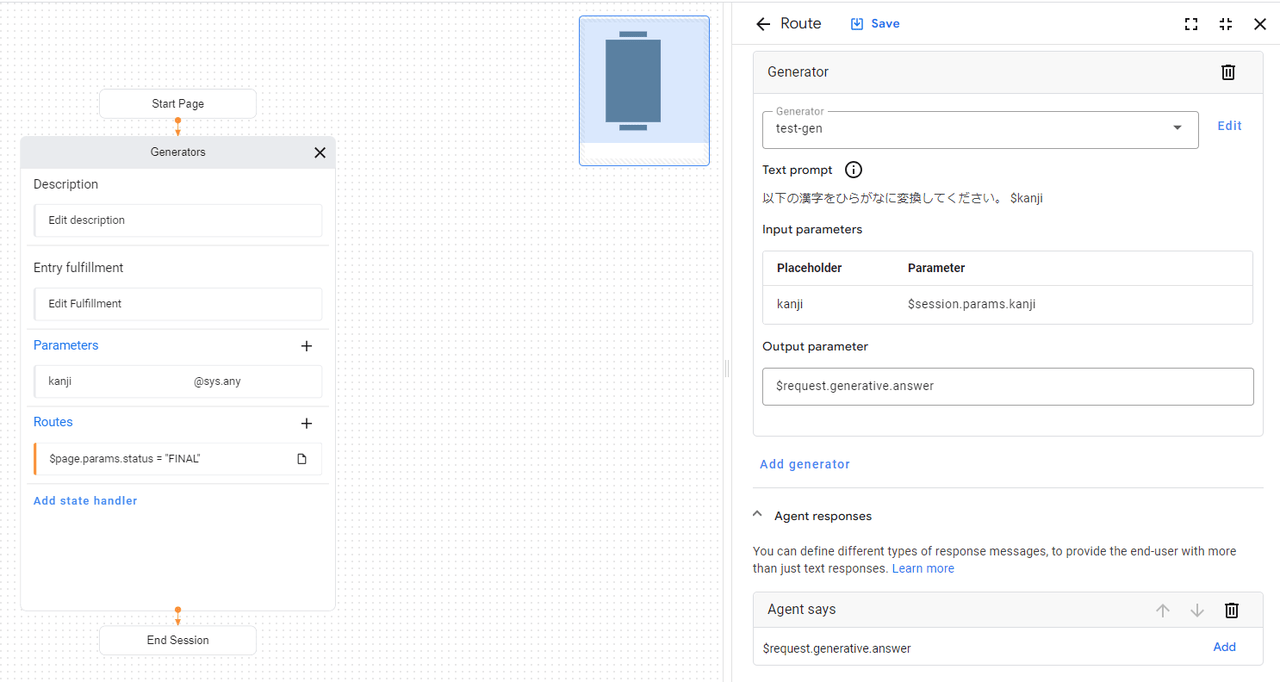
Generatorからの変換結果を$request.generative.answerで受け取り、Agent saysでAgentが変換結果を発話するように設定しています。
また、Generatorの細かい設定は以下の通りです。
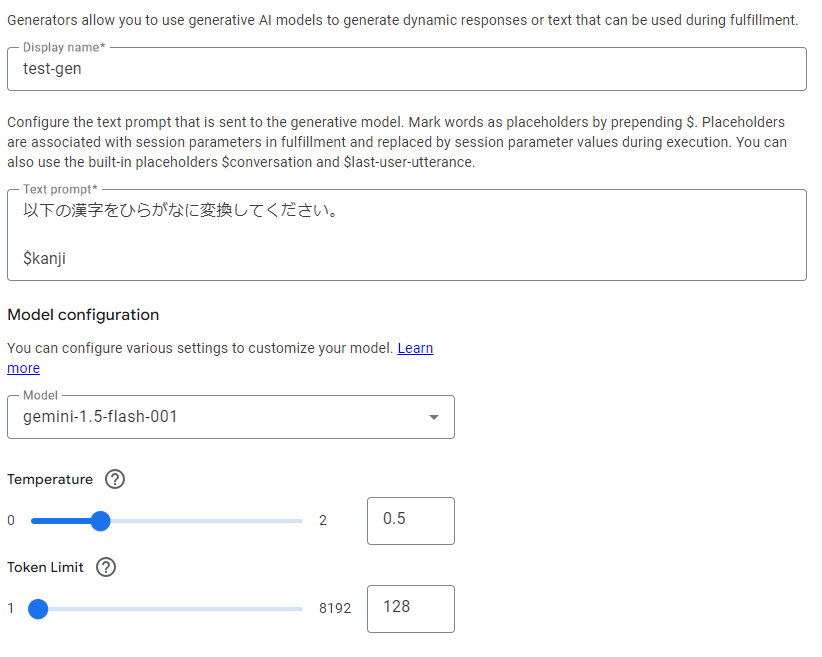
使用したいモデルを選択することもできますし、プロンプトを自由に書き換えることも可能です。
それでは実装したAgentの動作を確認してみます。
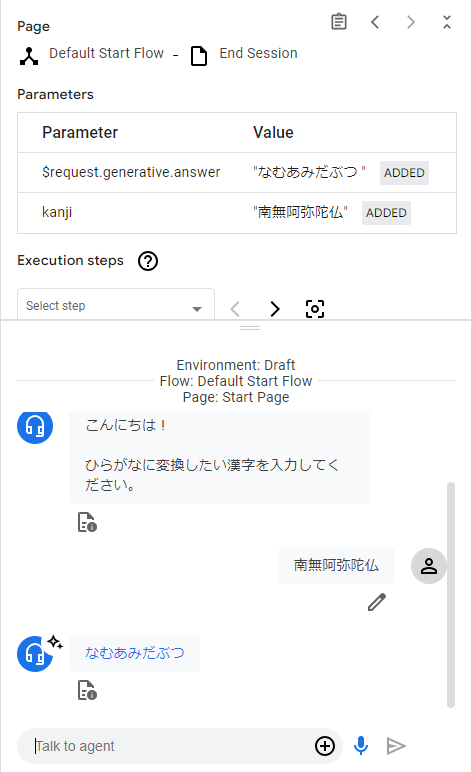
無事、漢字をひらがなに変換することが確認できました。
Webhookを使用する
続いて、Webhookを使って、APIを叩くことで生成AIを利用する方法を2つ紹介します。
※本節ではフローの全体像、Webhookのソースコードおよび実装結果を紹介します。Webhookの実装については以下のブログで紹介しているので、実装の詳細を知りたい方はご覧ください。
WebhookでGemini APIを使用する
WebhookでGemini APIを叩く方法を、実装したAgentをもとに紹介します。実装したAgentのフローは以下の通りです。
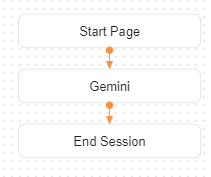
GeminiページにてGeminiへの質問のパラメータ「$session.params.question」を取得し、APIを叩きます。
WebhookのPythonソースコードは以下の通りです。
※requirement.txtにモジュールをインポートし忘れないように注意してください。
import functions_framework
import requests
import vertexai
from vertexai.generative_models import GenerationConfig, GenerativeModel, Part

def interview(project_id: str,location: str,model: str,text: str) -> str:
    # Initialize Vertex AI
    vertexai.init(project=project_id, location=location)

    # Load the model
    model = GenerativeModel(model_name=model)

    # Generation Config
    config = GenerationConfig(
        max_output_tokens=2048, temperature=0.4, top_p=1, top_k=32
    )

    # Generate text
    response = model.generate_content(
        text, generation_config=config
    )

    return response.text

@functions_framework.http
def webhook(request):
    response = request.get_json()
    text = response["sessionInfo"]["parameters"]["question"]
    tag = response["fulfillmentInfo"]["tag"]
    model = "gemini-1.5-flash"
    output_text = interview("プロジェクト名","リージョン",model,text)

    response["fulfillmentResponse"] = {
            "messages": [
                {
                    "text": {
                        "text": [
                            output_text
                        ],
                        "allowPlaybackInterruption": False
                    }
                }
            ]
        }
    return response
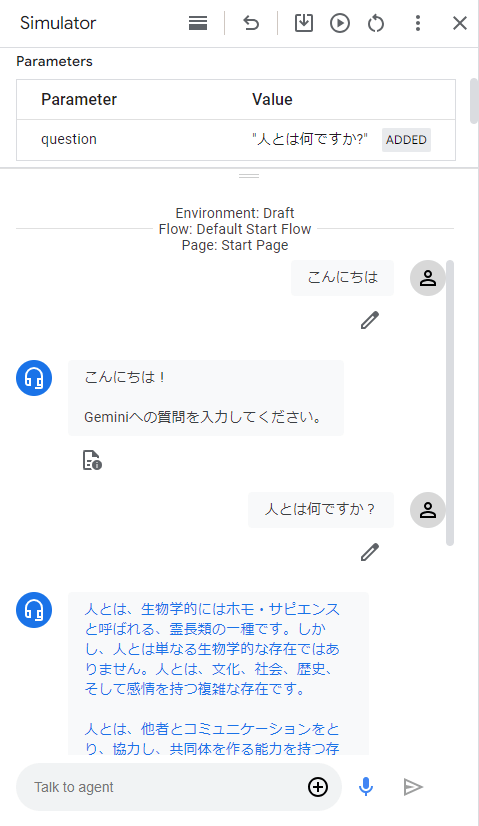
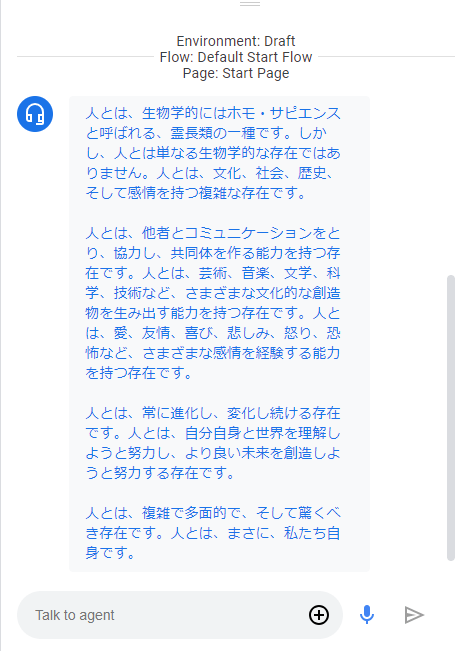
webhookをAgentに設定し、テストした結果は以下の通りです。
WebhookでAgent Builder Searchを使用する
WebhookでAgent Builder Search APIをたたく方法を実装したAgentをもとに紹介します。実装したAgentのフローは以下の通りです。
Gemini APIを叩くときと同様に、searchページにて質問のパラメータ「$session.params.question」を取得し、APIを叩きます。
Webhookを紹介する前に、Agent Builder Searchのアプリを作成します。
以下のドキュメントにしたがって、アプリとデータストアを作成します。(説明が長くなるので、詳細は割愛します。)
今回はtransformerの論文(pdf)をデータソースとして使用しました。
Agent Builder Searchの準備ができたので、Webhookのソースコードを紹介します。Pythonソースコードは以下の通りです。
※requirement.txtにモジュールをインポートし忘れないように注意してください。
import functions_framework
import vertexai
from google.cloud import discoveryengine
from vertexai.preview.generative_models import GenerativeModel, ChatSession
from typing import List
from google.cloud import storage
from google.oauth2 import service_account
import json
import requests

#Search用のparametersを定義
project_id = "プロジェクト名"
location = "global"
search_engine_id = "データストアのID"
#configIDはAgent Builderのコンソール→アプリ→統合で確認することができます。
serving_config_id = "configID"
location_v = "ロケーション"
model_name = "gemini-pro"

vertexai.init(project=project_id, location=location_v)
model = GenerativeModel(model_name)
chat = model.start_chat()

def extract_path_from_link(link: str):
    return "/".join(link[5:].split("/")[1:])

def search(
    project_id: str,
    location: str,
    search_engine_id: str,
    serving_config_id: str,
    search_query: str
    ) -> List[discoveryengine.SearchResponse.SearchResult]:

    client = discoveryengine.SearchServiceClient()

    serving_config = client.serving_config_path(
        project=project_id,
        location=location,
        data_store=search_engine_id,
        serving_config=serving_config_id,
    )

    request = discoveryengine.SearchRequest(
        serving_config=serving_config,
        query=search_query,
        page_size=2,
        content_search_spec=discoveryengine.SearchRequest.ContentSearchSpec(
            extractive_content_spec=discoveryengine.SearchRequest.ContentSearchSpec.ExtractiveContentSpec(
                max_extractive_segment_count=1,
                max_extractive_answer_count=1,
            ),
            snippet_spec=discoveryengine.SearchRequest.ContentSearchSpec.SnippetSpec(
                return_snippet=True,
            ),
            summary_spec=discoveryengine.SearchRequest.ContentSearchSpec.SummarySpec(
                summary_result_count=5,
                include_citations=True,
            ),
        ),
    )

    response = client.search(request)

    search_result = {}
    search_result = {
        "answer": response.summary.summary_text,
        "retrieved_texts": [
            {
                "document_path": extract_path_from_link(result.document.derived_struct_data["link"]),
                "link": result.document.derived_struct_data["link"],
                "snippets": result.document.derived_struct_data["snippets"][0]["snippet"],
                "text": result.document.derived_struct_data["extractive_segments"][0]["content"],
            }
            for result in response.results
        ],
    }

    search_result_text = search_result["answer"]

    return search_result_text

@functions_framework.http
def search_document(request):
    response = request.get_json()
    sentence = response["sessionInfo"]["parameters"]["question"]
    tag = response["fulfillmentInfo"]["tag"]

    output_text= search(project_id, location, search_engine_id, serving_config_id, sentence)

    response["fulfillmentResponse"] = {
            "messages": [
                {
                    "text": {
                        "text": [
                            output_text
                        ],
                        "allowPlaybackInterruption": False
                    }
                }
            ]
        }

    return response
上記のWebhookでは検索結果の要約のみをAgentに返すように設定しています。
WebhookをAgentに設定し、テストした結果は以下の通りです。
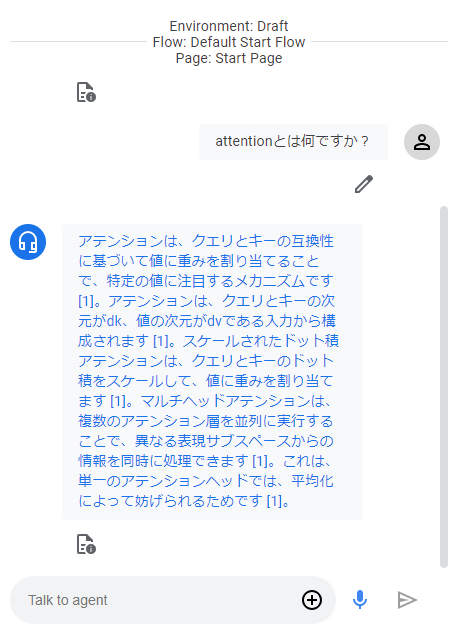
論文の内容であるAttentionについてしっかり回答してくれました!!
Agent Builder Conversationを使用する
最後にAgent Builder Conversationを使用する方法を紹介します。本サービスですが、2024年9月現在日本語版がプレビューであることに注意してください。
さて、Agent Builder Conversationにアクセスするわけですが、もちろんAgent Builderのコンソールからアクセスできます。しかし、今回はDialogflow CXのコンソールからアクセスする方法を紹介します。
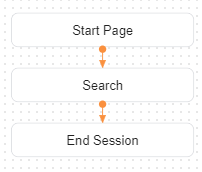
まず、Dialogflow CXのコンソールにアクセスし、言語はja、ロケーションはglobalでAgentを作成します。作成したら、Start Pageの詳細を見ます。
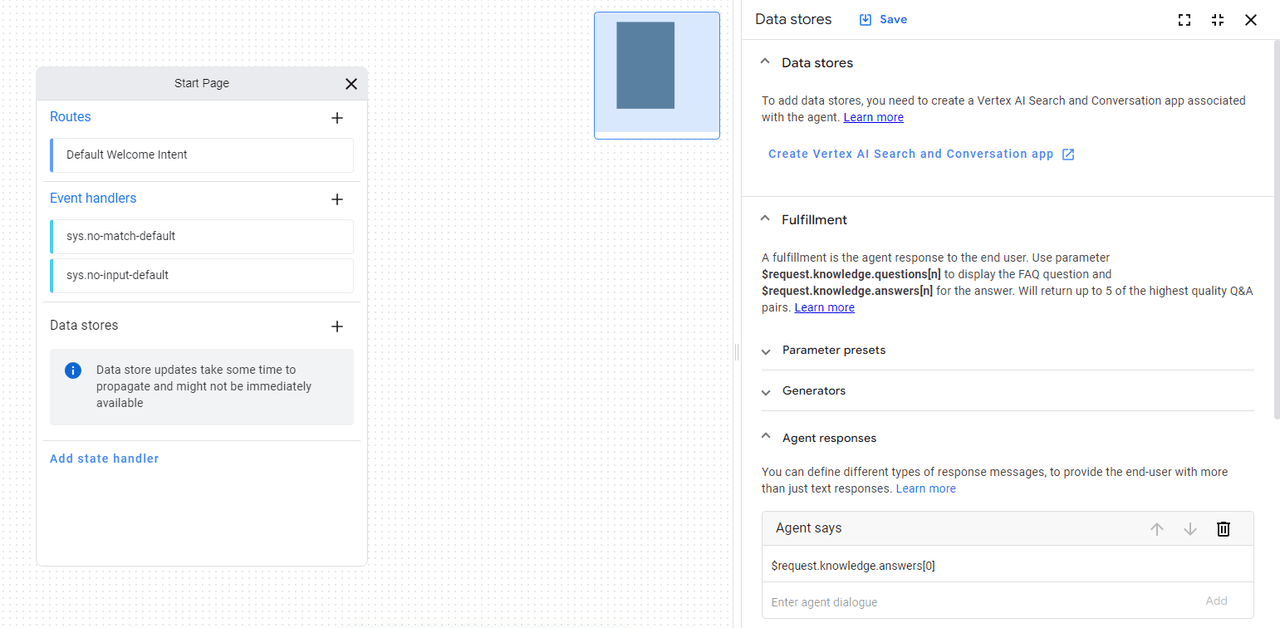
[Add State handler]→[Data Stores]にチェック→[Apply]を押下します。

Data Storesの[+]を押下したのち、画面右の[Create Vertex AI Search and Conversation App]を押下します。
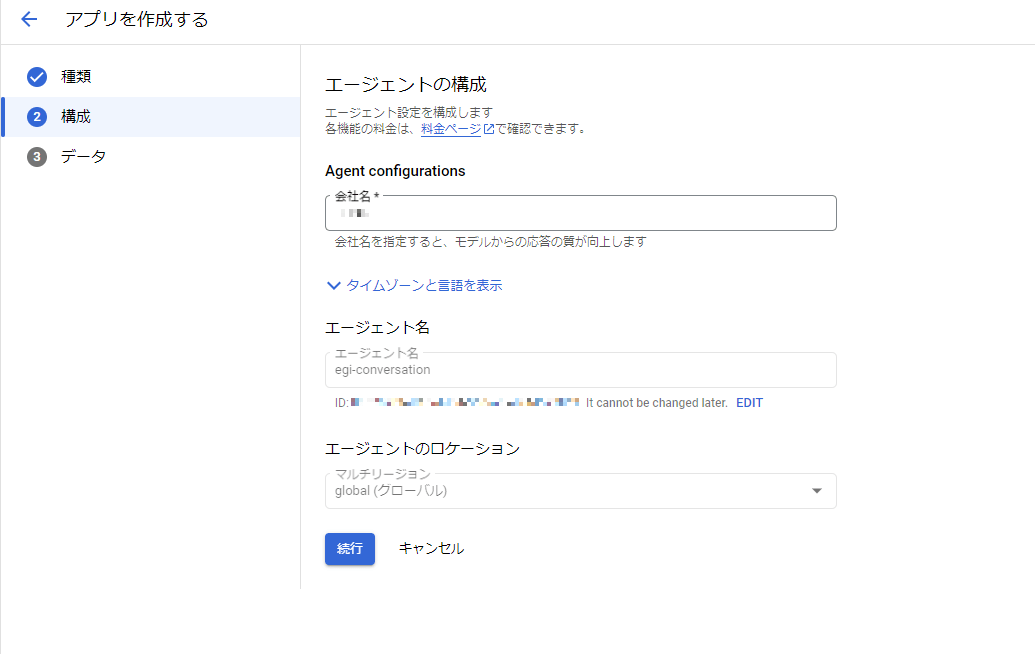
Agent Builderのコンソールが立ち上がるので、エージェントの構成を設定します。設定が終わったら[続行]を押下します。
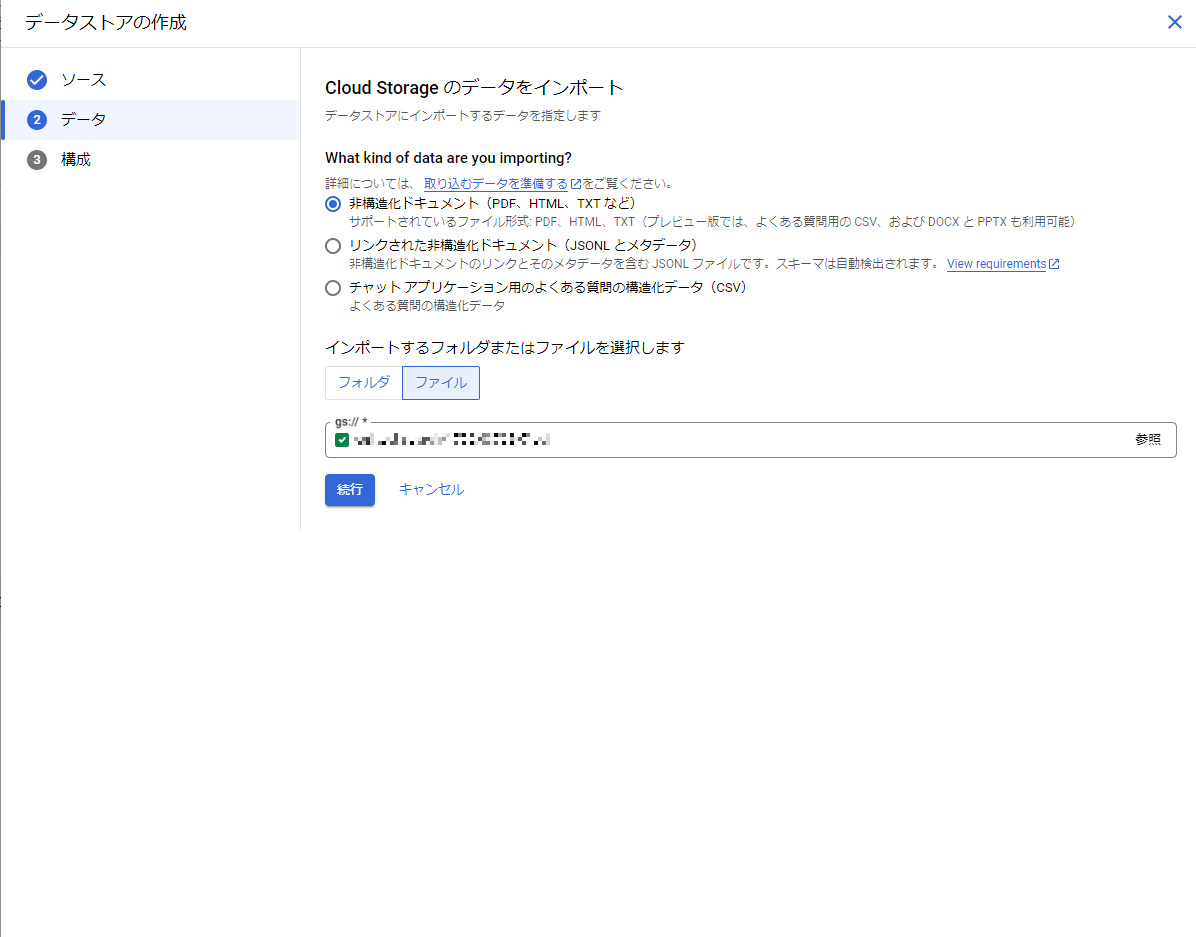
データストアにインポートするデータを選択します。Agent Builder Searchの手法と同様にtransformerの論文(pdf)をデータソースとしてインポートします。設定が終わったら[続行]を押下します。
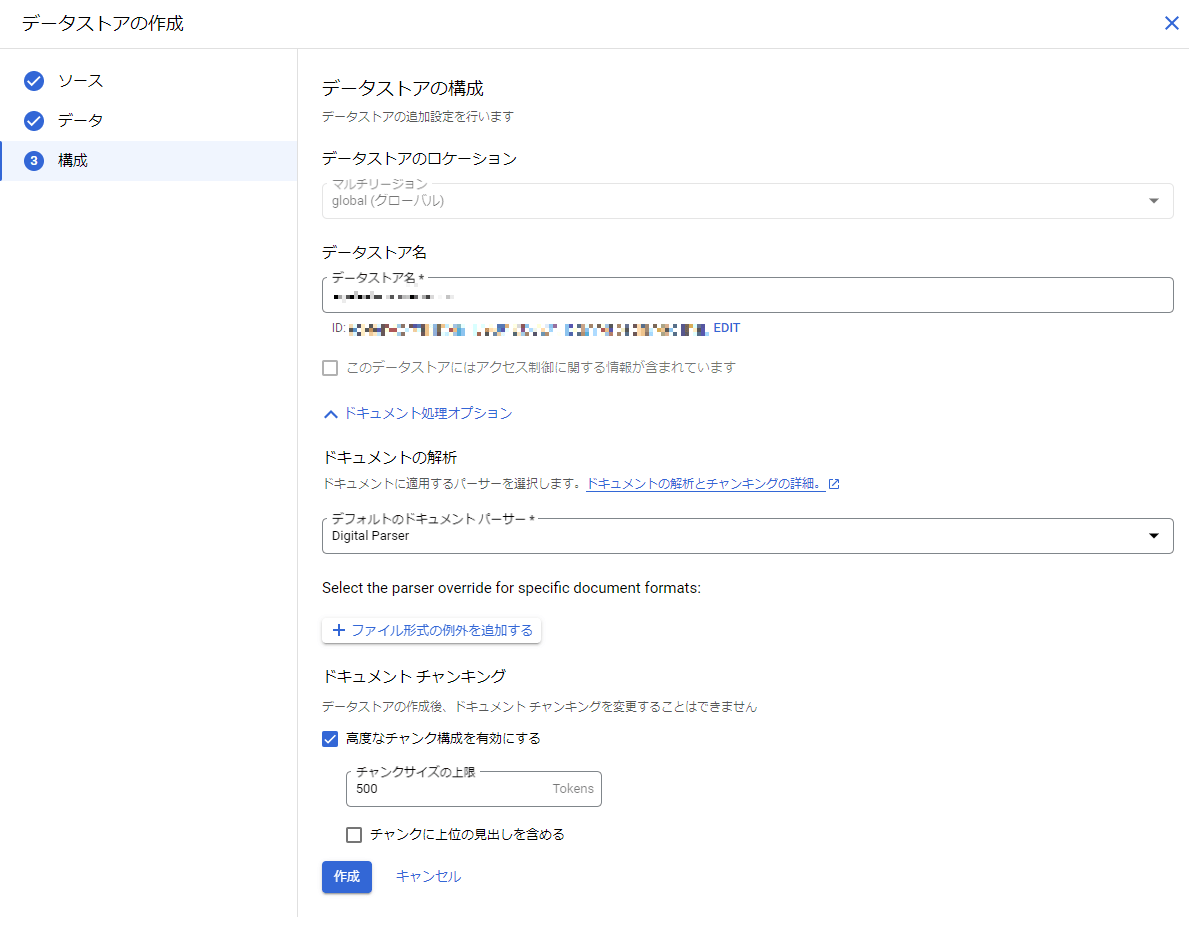
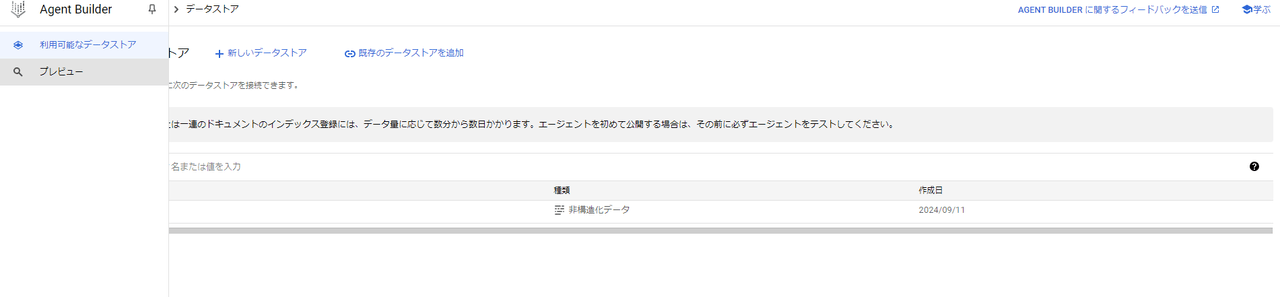
データストアの設定を行い、[作成]を押下します。
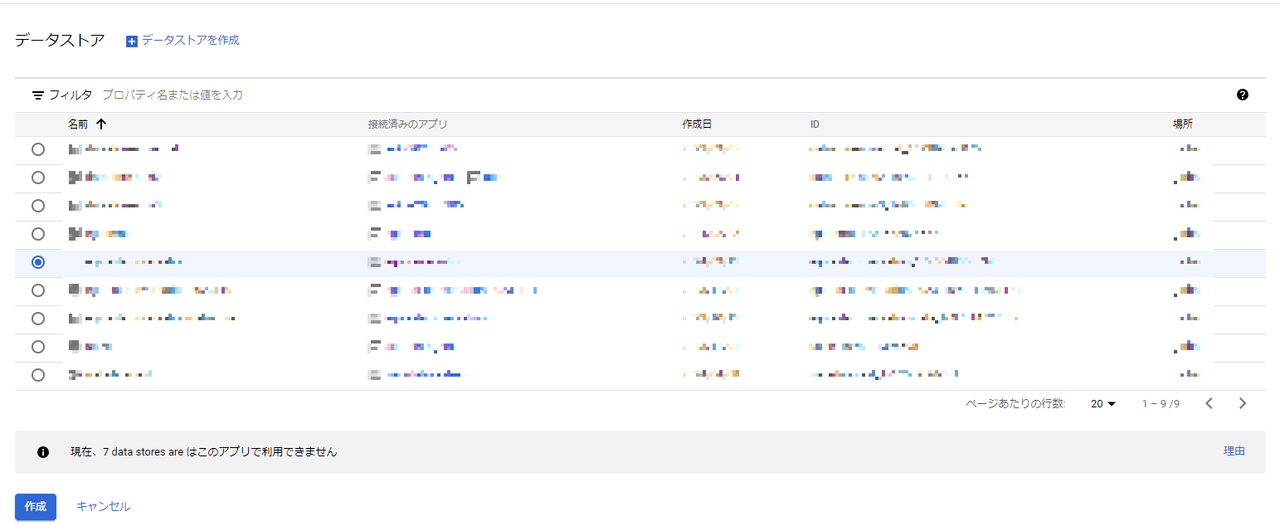
作成したデータストアを選択し、[作成]を押下します。
作成が完了したら、画面左にある[プレビュー]を押下します。
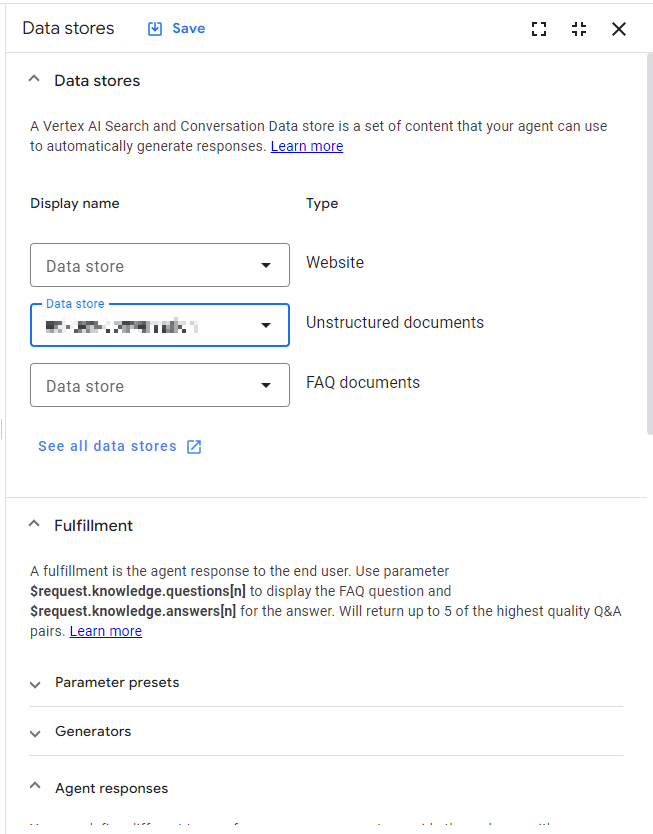
Dialogflow CXのコンソールが立ち上がるので、Agent Builderのコンソールを開いたときと同様に[Add State handler]から以下のデータストア設定画面を開きます。Unstructured documentsから作成したデータストアを選択し、[Save]を押下します。
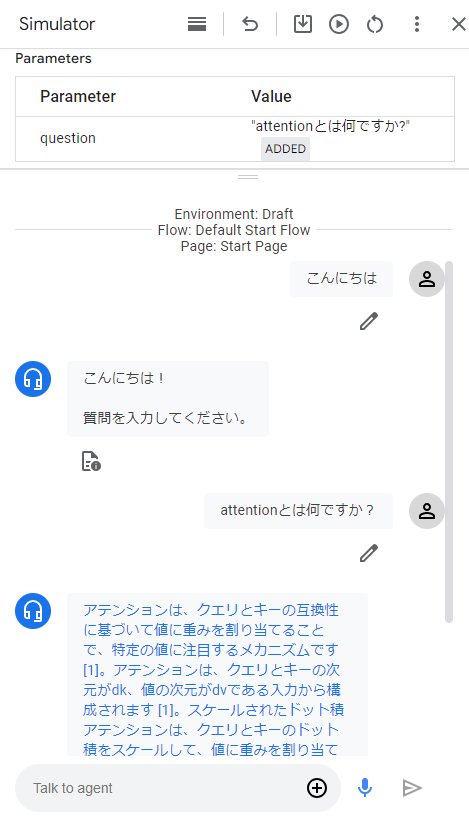
これで準備は完了です。Agentをテストしてみると、以下の結果となりました。
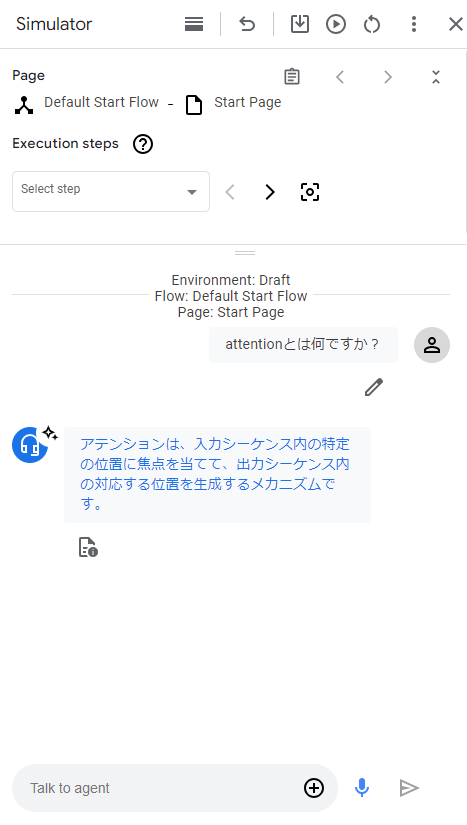
文章は短いですが、Attentionについて答えてくれました!!
おわりに
今回はDialogflow CXで生成AIを使う方法をまとめてみました。
Dialogflow CXで生成AIを使う方法が多いと感じたのではないでしょうか?
2度目になりますが、2024年9月現在、Agent Builder Conversationは日本語がpreviewなので注意してください。
本記事が皆様のお役にたてば幸いです。
最後まで読んでいただきありがとうございました。