
こんにちは。SCSK石原です。
AWSを利用した開発において、Cloud9を利用する機会はあるかと思います。
Cloud9ではコードを修正や踏み台(プライベートサブネットに存在するRDSやEC2にアクセスするため)などに利用できます。
このCloud9ですが、IAMユーザに対して紐づくものとなっていますので、基本的には利用する人が利用したいタイミングで自ら作成するというのが、本来のあり方かと思います。WEBコンソールから作成した場合、作成したIAMユーザがオーナーとなります。他のメンバーが利用するためにはCLIでオーナーを変更するか、共有することが必要となります。
開発チーム・インフラチームなどと分かれている場合には、VPCやサブネットなどのリソースをインフラチームが管理していることから、払い出しの依頼が来ることもあります。(Ex 取り敢えず、アサインされていてIAMユーザを持っている人全員の環境を払い出しておいて・・・etc…)
Cloud9環境を他のユーザ向けに払い出すのは意外と手間のかかる作業でしたので、テンプレートを作成しました。ぜひご活用ください。
事前準備(VPC)
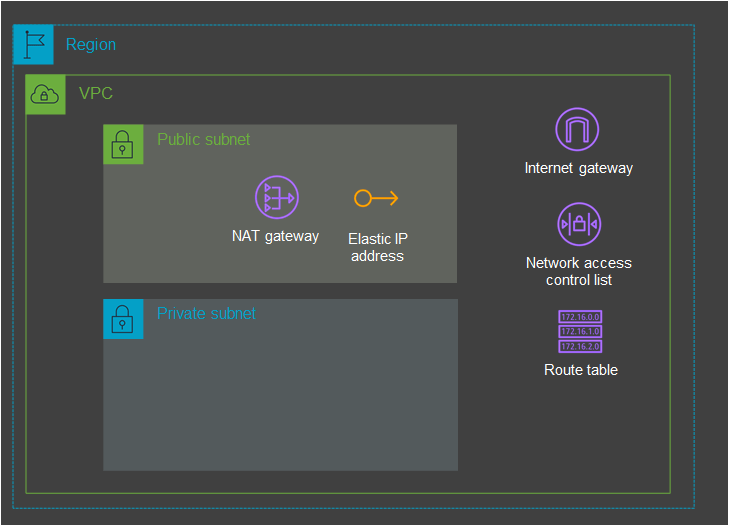
事前にVPCなどネットワーク関連のリソースを準備しておきます。
Cloud9環境はプライベートサブネットに作成することを想定しています。
Cloud9環境にクライアントから接続する際は、「AWS Systems Manager」を経由することによりインバウンド通信の許可が必要ありません。その代わりにCloud9からアウトバウンド通信が必要になりますので、NATゲートウェイかVPCエンドポイントを用意します。

今回はNATゲートウェイを利用しています。
上記の構成を作成するテンプレートは以下の通りです。
AWSTemplateFormatVersion: "2010-09-09"
Description: "sample-nw Template"
Parameters:
  ProjectID:
    Type: String
    MinLength: 3
    MaxLength: 15
    Default: "sample"
    AllowedValues:
      - "sample"

Resources:
# ================================
# VPC
# ================================
  SAMPLEVPC:
    Type: "AWS::EC2::VPC"
    Properties:
      CidrBlock: "192.168.0.0/16"
      EnableDnsSupport: true
      EnableDnsHostnames: true
      InstanceTenancy: "default"
      Tags:
        - Key: "Name"
          Value: !Sub "${ProjectID}-vpc"

# ================================
# Subnet
# ================================
  SubnetNW1a:
    Type: "AWS::EC2::Subnet"
    Properties:
      AvailabilityZone: !Sub "${AWS::Region}a"
      CidrBlock: "192.168.0.0/24"
      VpcId: !Ref SAMPLEVPC
      MapPublicIpOnLaunch: false
      Tags:
        - Key: "Name"
          Value: !Sub "${ProjectID}-nw-public-1a"

  SubnetDev1a:
    Type: "AWS::EC2::Subnet"
    Properties:
      AvailabilityZone: !Sub "${AWS::Region}a"
      CidrBlock: "192.168.1.0/24"
      VpcId: !Ref SAMPLEVPC
      MapPublicIpOnLaunch: false
      Tags:
        - Key: "Name"
          Value: !Sub "${ProjectID}-dev-private-1a"

# ================================
# ACL
# ================================
  NetworkAclNW:
    Type: "AWS::EC2::NetworkAcl"
    Properties:
      VpcId: !Ref SAMPLEVPC
      Tags:
        - Key: "Name"
          Value: !Sub "${ProjectID}-nw-acl"

  NetworkAclDev:
    Type: "AWS::EC2::NetworkAcl"
    Properties:
      VpcId: !Ref SAMPLEVPC
      Tags:
        - Key: "Name"
          Value: !Sub "${ProjectID}-dev-acl"

# # ACL association
  NetworkAclAssociationNW1a:
    Type: "AWS::EC2::SubnetNetworkAclAssociation"
    Properties:
      SubnetId: !Ref SubnetNW1a
      NetworkAclId: !Ref NetworkAclNW
  NetworkAclAssociationDev1a:
    Type: "AWS::EC2::SubnetNetworkAclAssociation"
    Properties:
      SubnetId: !Ref SubnetDev1a
      NetworkAclId: !Ref NetworkAclDev

# # ACL NW Egress
  NetworkAclEntryNWEg100:
    Type: "AWS::EC2::NetworkAclEntry"
    Properties:
      CidrBlock: "0.0.0.0/0"
      Egress: true
      NetworkAclId: !Ref NetworkAclNW
      Protocol: -1
      RuleAction: "allow"
      RuleNumber: 100

# # ACL NW Ingress
  NetworkAclEntryNWIg100:
    Type: "AWS::EC2::NetworkAclEntry"
    Properties:
      CidrBlock: "0.0.0.0/0"
      Egress: false
      NetworkAclId: !Ref NetworkAclNW
      Protocol: -1
      RuleAction: "allow"
      RuleNumber: 100

# # ACL Dev Egress
  NetworkAclEntryEC2Eg100:
    Type: "AWS::EC2::NetworkAclEntry"
    Properties:
      CidrBlock: "0.0.0.0/0"
      Egress: true
      NetworkAclId: !Ref NetworkAclDev
      Protocol: -1
      RuleAction: "allow"
      RuleNumber: 100

# # ACL Dev Ingress
  NetworkAclEntryEC2Ig100:
    Type: "AWS::EC2::NetworkAclEntry"
    Properties:
      CidrBlock: "0.0.0.0/0"
      Egress: false
      NetworkAclId: !Ref NetworkAclDev
      Protocol: -1
      RuleAction: "allow"
      RuleNumber: 100

# ================================
# Route Table
# ================================
  RouteTableNW:
    Type: "AWS::EC2::RouteTable"
    Properties:
      VpcId: !Ref SAMPLEVPC
      Tags:
        - Key: "Name"
          Value: !Sub "${ProjectID}-nw-public-rt"

  RouteTableDev:
    Type: "AWS::EC2::RouteTable"
    Properties:
      VpcId: !Ref SAMPLEVPC
      Tags:
        - Key: "Name"
          Value: !Sub "${ProjectID}-dev-private-rt"

# route table association
  RouteTableAssociationNW1a:
    Type: "AWS::EC2::SubnetRouteTableAssociation"
    Properties:
      RouteTableId: !Ref RouteTableNW
      SubnetId: !Ref SubnetNW1a

  RouteTableAssociationDev1a:
    Type: "AWS::EC2::SubnetRouteTableAssociation"
    Properties:
      RouteTableId: !Ref RouteTableDev
      SubnetId: !Ref SubnetDev1a

# ================================
# NAT Gateway
# ================================
  InternetGateway:
    Type: AWS::EC2::InternetGateway
    Properties:
      Tags:
      - Key: stack
        Value: !Sub "${ProjectID}-igw"

  EIPNATGW:
    Type: AWS::EC2::EIP
    Properties:
      Domain: vpc

  NatGateway:
    Type: AWS::EC2::NatGateway
    Properties:
      AllocationId: !GetAtt EIPNATGW.AllocationId
      SubnetId: !Ref SubnetNW1a

  VPCGatewayAttachment:
    Type: AWS::EC2::VPCGatewayAttachment
    Properties:
      InternetGatewayId: !Ref InternetGateway
      VpcId: !Ref SAMPLEVPC

  OutBoundOnlyRoute:
    Type: AWS::EC2::Route
    Properties:
      DestinationCidrBlock: "0.0.0.0/0"
      NatGatewayId: !Ref NatGateway
      RouteTableId: !Ref RouteTableDev

  PublicRoute:
    Type: AWS::EC2::Route
    Properties:
      DestinationCidrBlock: "0.0.0.0/0"
      GatewayId: !Ref InternetGateway
      RouteTableId: !Ref RouteTableNW

Outputs:
  # Subnet_Dev
  OUTPUTSubnetDev1a:
    Description: subnet dev 1a
    Value: !Ref SubnetDev1a
    Export:
      Name: !Sub "${ProjectID}-subnet-dev-1a"
Cloud9作成用テンプレート
Cloud9を作成するテンプレートは以下の通りです。
|
ProjectID
|
任意(Cloud9の環境名に利用しています) |
|
IAMUserName
|
利用するIAMユーザ名を入力してください |
|
SelectInstanceType
|
Cloud9環境のインスタンスタイプを入力してください |
|
SubnetID
|
Cloud9環境を配置するサブネットのIDを入力してください |
AWSTemplateFormatVersion: "2010-09-09"
Description: "Cloud9 Template"
Parameters:
  ProjectID:
    Type: String
    MinLength: 3
    MaxLength: 15
  IAMUserName:
    Type: String
  SelectInstanceType:
    Type: String
    Default: t2.micro
    AllowedValues:
      - t2.micro
      - t3.small
      - m5.large
  # Please rewrite the subnet ID before use.
  SubnetID:
    Type: String
    Default: subnet-xxxxxxxxxxxx
    # AllowedValues:
    #   - subnet-xxxxxxxxxxxx
    #   - subnet-yyyyyyyyyyyy

Resources:
# ================================
# Cloud9
# ================================
  Cloud9Instance:
    Type: AWS::Cloud9::EnvironmentEC2
    Properties:
      AutomaticStopTimeMinutes: 60
      ConnectionType: CONNECT_SSM
      Description: !Sub "${IAMUserName}-${ProjectID}-cloud9-ide"
      ImageId: "resolve:ssm:/aws/service/cloud9/amis/amazonlinux-2-x86_64"
      InstanceType: !Ref SelectInstanceType
      Name: !Sub "${IAMUserName}-${ProjectID}-cloud9-ide"
      OwnerArn: !Sub "arn:aws:iam::${AWS::AccountId}:user/${IAMUserName}"
      SubnetId: !Ref SubnetID

Outputs:
  Cloud9IDEURL:
    Description: Cloud9 IDE URL
    Value: !Join
        - ""
        - - "https://ap-northeast-1.console.aws.amazon.com/cloud9/ide/"
          - !Ref Cloud9Instance
Cloud9環境には、コンソールまたはCFnのOutputsで出力されたURLからアクセスできます。
終わりに
今回は、インフラ担当者がCloud9環境を払い出すという目的になっています。開発者自身に環境を払い出してもらう場合には、サービスカタログに登録することをお勧めします。
下記のCloud9とサービスカタログのエンドユーザ系の権限だけで利用できるので、不用意に強い権限を与えることなく開発環境を利用できます。
|
AWSCloud9EnvironmentMember |
|
AWSServiceCatalogEndUserFullAccess |
ぜひ、テンプレートを活用してたくさん環境を作成しましょう。