

こんにちは、SCSKの伊藤です。
LifeKeeperは特長である『直観的なUI』に加え、利便性の高いCLIも備えています。
本記事では、LifeKeeper for LinuxをCLIのみで構築する流れをご紹介します。
CLIで構築する際の注意点
本手順で使用するLKCLIは、v9.5.0から実装された機能でありバージョンによって対応しているARKが異なりますので、バージョンに合わせたドキュメントを参照しておく必要があります。
■LKCLIガイド(v10.0)

v10.0については、LifeKeeper for Linuxインストレーションガイドの 『Linuxの依存関係』 に記載のある「一般的なパッケージの依存関係」のパッケージをインストールしていれば、LinuxOS上のデスクトップ環境のパッケージ導入は必須ではありません。
その他のバージョンについては、デスクトップ環境のパッケージ導入は必須になる場合もありますので、事前にサポートに確認するようにしてください。
LifeKeeper for LinuxをCLIだけで構築してみた。
さっそく、LifeKeeper for Linuxの構築をCLIだけで実施していきます。
ターミナルの背景について、LifeKeeperセットアップ画面を除き赤はアクティブサーバ、青はスタンバイサーバになります。
実施環境は以下の通り。
■環境情報
| ホスト名 | アクティブサーバ = rhel01 スタンバイサーバ = rhel02 |
| OS | Red Hat Enterprise Linux release 8.6 (Ootpa) |
| 導入するLifeKeeper製品 | LifeKeeper for Linux v10.0 |
■コミュニケーションパス
| 優先度1 | 192.168.10.101/192.168.10.102 |
| 優先度2 | 192.168.11.101/192.168.11.102 |
■作成するリソース階層
| /kdump | ファイルシステムリソース |
| datarep-/kdump | データレプリケーションリソース |
| ip-192.168.11.200 | IPアドレスリソース |
■ファイルパス
| インストールイメージ | /work/LifeKeeper_linux_10-0-0.img |
| ライセンスファイル | /tmp/lk.lic |
1.アクティブサーバでインストールイメージを確認します。
| [root@rhel01 ~]# ls -l /work/LifeKeeper_linux_10-0-0.img -rw-r–r–. 1 root root 431099904 12月 18 16:20 /work/LifeKeeper_linux_10-0-0.img |
2.インストールイメージをマウントします。
| [root@rhel01 ~]# mount /work/LifeKeeper_linux_10-0-0.img /media -t iso9660 -o loop mount: /media: 警告: デバイスは書き込み禁止です、読み込み専用でマウントします. |
3.マウント先のディレクトリに移動し、セットアップを実行します。
| [root@rhel01 ~]# cd /media [root@rhel01 media]# ./setup |
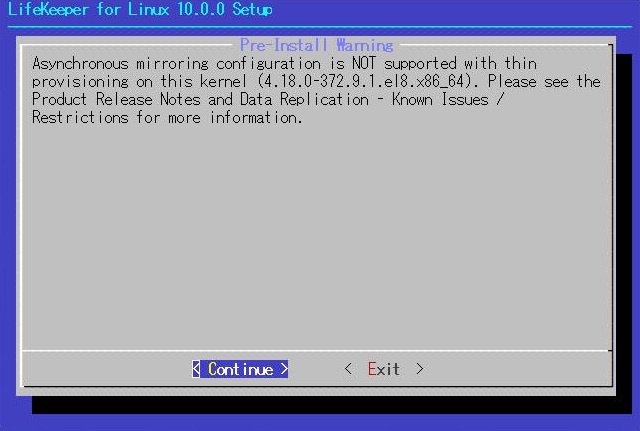
4.非同期ミラーリング構成が未サポートである旨の警告が表示されますので、[< Continue >]を選択します。
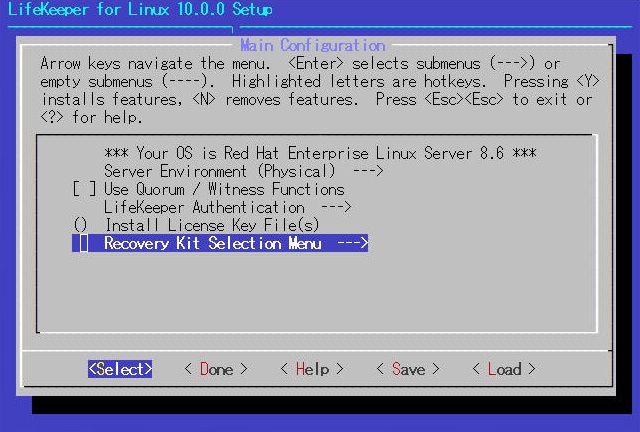
5.[Recovery Kit Selection Menu]を選び、[<Select>]を選択して先に進めます。
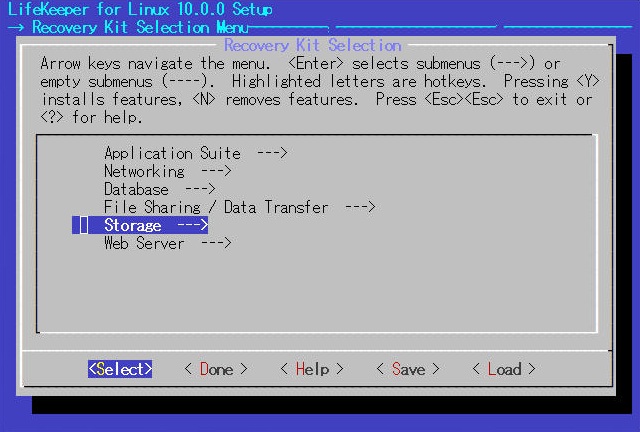
6.[Storage —>]を選び、[<Select>]を選択して先に進めます。
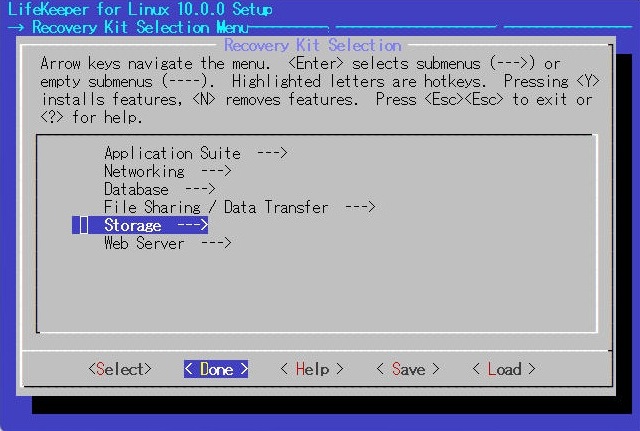
7.[DataKeeper for Linux]にチェックを入れ、[< Done >]を選択して前の画面に戻ります。

8.そのまま[< Done >]を選択して前の画面に戻ります。
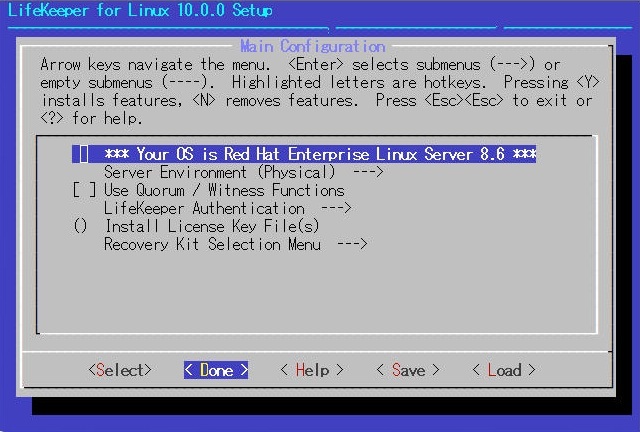
9.そのまま[< Done >]を選択してインストール構成を確定します。
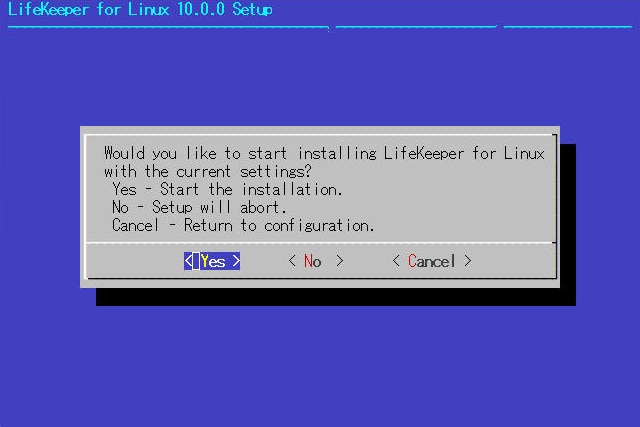
10.インストールの確認画面が表示されるので、[< Yes >]を選択してインストールを開始します。
11.セットアップが完了することを確認します。
| Configure LifeKeeper management group Setup complete. |
12.インストールイメージをアンマウントします。
| [root@rhel01 media]# cd / [root@rhel01 /]# umount /media |
13.ライセンスファイルを読み込みライセンスキーを登録します。
| [root@rhel01 media]# /opt/LifeKeeper/bin/lkkeyins /tmp/lk.lic LifeKeeper license key installation was successful! |
14.LifeKeeperを起動します。
| [root@rhel01 media]# /opt/LifeKeeper/bin/lkstart Created symlink /etc/systemd/system/lifekeeper-graphical.target.requires/lifekeeper.service → /usr/lib/systemd/system/lifekeeper.service. Created symlink /etc/systemd/system/lifekeeper-multi-user.target.requires/lifekeeper.service → /usr/lib/systemd/system/lifekeeper.service. |
15.続けて、スタンバイサーバにてLifeKeeper for Linuxをインストールしていきます。
アクティブサーバでインストールイメージを確認します。
| [root@rhel02 ~]# ls -l /work/LifeKeeper_linux_10-0-0.img -rw-r–r–. 1 root root 431099904 12月 18 16:20 /work/LifeKeeper_linux_10-0-0.img |
16.インストールイメージをマウントします。
| [root@rhel02 ~]# mount /work/LifeKeeper_linux_10-0-0.img /media -t iso9660 -o loop mount: /media: 警告: デバイスは書き込み禁止です、読み込み専用でマウントします. |
17.マウント先のディレクトリに移動し、セットアップを実行します。
| [root@rhel02 ~]# cd /media [root@rhel02 media]# ./setup |
18.非同期ミラーリング構成が未サポートである旨の警告が表示されますので、[< Continue >]を選択します。
19.[Recovery Kit Selection Menu]を選び、[<Select>]を選択して先に進めます。
20.[Storage —>]を選び、[<Select>]を選択して先に進めます。
21.[DaataKeeper for Linux]にチェックを入れ、[< Done >]を選択して前の画面に戻ります。
22.そのまま[< Done >]を選択して前の画面に戻ります。
23.そのまま[< Done >]を選択してインストール構成を確定します。
24.インストールの確認画面が表示されるので、[< Yes >]を選択してインストールを開始します。
25.セットアップが完了することを確認します。
| Configure LifeKeeper management group Setup complete. |
26.インストールイメージをアンマウントします。
| [root@rhel02 media]# cd / [root@rhel02 /]# umount /media |
27.ライセンスファイルを読み込みライセンスキーを登録します。
| [root@rhel02 media]# /opt/LifeKeeper/bin/lkkeyins /tmp/lk.lic LifeKeeper license key installation was successful! |
28.LifeKeeperを起動します。
| [root@rhel02 media]# /opt/LifeKeeper/bin/lkstart Created symlink /etc/systemd/system/lifekeeper-graphical.target.requires/lifekeeper.service → /usr/lib/systemd/system/lifekeeper.service. Created symlink /etc/systemd/system/lifekeeper-multi-user.target.requires/lifekeeper.service → /usr/lib/systemd/system/lifekeeper.service. |
29.それぞれのサーバでlcdstatusが表示できることを確認します。
| [root@rhel01 /]# /opt/LifeKeeper/bin/lcdstatus -e BACKUP TAG ID STATE PRIO PRIMARY |
| [root@rhel02 /]# /opt/LifeKeeper/bin/lcdstatus -e BACKUP TAG ID STATE PRIO PRIMARY |
30.アクティブサーバで1本目のコミュニケーションパスを登録します。
| [root@rhel01 ~]# /opt/LifeKeeper/bin/lkcli commpath create --laddr 192.168.10.101 --raddr 192.168.10.102 --dest rhel02 Performing commpath ‘rhel02:192.168.10.101/192.168.10.102’ create… Commpath ‘rhel02:192.168.10.101/192.168.10.102’ created successful. |
31.続けて2本目のコミュニケーションパスを登録します。
| [root@rhel01 ~]# /opt/LifeKeeper/bin/lkcli commpath create --laddr 192.168.11.101 --raddr 192.168.11.102 --dest rhel02 Performing commpath ‘rhel02:192.168.11.101/192.168.11.102’ create… Commpath ‘rhel02:192.168.11.101/192.168.11.102’ created successful. |
32.コミュニケーションパスが登録されたことを確認します。※このタイミングではSTATEがDEAD状態になります※
| [root@rhel01 ~]# /opt/LifeKeeper/bin/lcdstatus -e BACKUP TAG ID STATE PRIO PRIMARY MACHINE NETWORK ADDRESSES/DEVICE STATE PRIO rhel02 TCP 192.168.10.101/192.168.10.102 DEAD 1 rhel02 TCP 192.168.11.101/192.168.11.102 DEAD 2 |
33.スタンバイサーバで1本目のコミュニケーションパスを登録します。
| [root@rhel02 ~]# /opt/LifeKeeper/bin/lkcli commpath create --laddr 192.168.10.102 --raddr 192.168.10.101 --dest rhel01 Performing commpath ‘rhel01:192.168.10.102/192.168.10.101’ create… Commpath ‘rhel01:192.168.10.102/192.168.10.101’ created successful. |
34.続けて2本目のコミュニケーションパスを登録します。
| [root@rhel02 ~]# /opt/LifeKeeper/bin/lkcli commpath create --laddr 192.168.11.102 --raddr 192.168.11.101 --dest rhel01 Performing commpath ‘rhel01:192.168.11.102/192.168.11.101’ create… Commpath ‘rhel01:192.168.11.102/192.168.11.101’ created successful. |
35.コミュニケーションパスが登録されたことを確認します。※このタイミングでSTATEがALIVE状態になります※
| [root@rhel02 ~]# /opt/LifeKeeper/bin/lcdstatus -e BACKUP TAG ID STATE PRIO PRIMARY MACHINE NETWORK ADDRESSES/DEVICE STATE PRIO rhel01 TCP 192.168.10.102/192.168.10.101 ALIVE 1 rhel01 TCP 192.168.11.102/192.168.11.101 ALIVE 2 |
| [root@rhel01 ~]# /opt/LifeKeeper/bin/lcdstatus -e BACKUP TAG ID STATE PRIO PRIMARY MACHINE NETWORK ADDRESSES/DEVICE STATE PRIO rhel02 TCP 192.168.10.101/192.168.10.102 ALIVE 1 rhel02 TCP 192.168.11.101/192.168.11.102 ALIVE 2 |
36.アクティブサーバでLifeKeeper設定ファイルを置換してブロードキャストPINGモードを無効化します。
| [root@rhel01 ~]# vi /etc/default/LifeKeeper :%s/NOBCASTPING=0/NOBCASTPING=1/g :wq! |
37.設定値が「NOBCASTPING=1」になっていることを確認します。
| [root@rhel01 ~]# cat /etc/default/LifeKeeper | grep NOBCASTPING= NOBCASTPING=1 # Can be used to disable the broadcast ping mechanism |
38.スタンバイサーバでLifeKeeper設定ファイルを置換してブロードキャストPINGモードを無効化します。
| [root@rhel02 ~]# vi /etc/default/LifeKeeper :%s/NOBCASTPING=0/NOBCASTPING=1/g :wq! |
39.設定値が「NOBCASTPING=1」になっていることを確認します。
| [root@rhel02 ~]# cat /etc/default/LifeKeeper | grep NOBCASTPING= NOBCASTPING=1 # Can be used to disable the broadcast ping mechanism |
40.アクティブサーバでIPアドレスリソースを作成します。
| [root@rhel01 ~]# /opt/LifeKeeper/bin/lkcli resource create ip --tag ip-192.168.11.200 --ipaddr 192.168.11.200 BEGIN create of “ip-192.168.11.200” LifeKeeper application=comm on rhel01. LifeKeeper communications resource type= ip on rhel01. Creating resource instance with id IP-192.168.11.200 on machine rhel01 Resource successfully created on rhel01 BEGIN restore of “ip-192.168.11.200” END successful restore of “ip-192.168.11.200” END successful create of “ip-192.168.11.200”. |
41.作成したIPアドレスリソースのPINGリストを登録します。
| [root@rhel01 ~]# /opt/LifeKeeper/bin/lkcli resource config ip --tag ip-192.168.11.200 --pinglist 192.168.11.1 Saving new ping list for subnet 192.168.11.0: |
42.PINGリストに登録されたことを確認します。
| [root@rhel01 ~]# cat /opt/LifeKeeper/subsys/comm/resources/ip/pinglist.192.168.11.0 192.168.11.1 |
43.アクティブサーバにてリソースのステータスを確認します
| [root@rhel01 ~]# /opt/LifeKeeper/bin/lcdstatus -e BACKUP TAG ID STATE PRIO PRIMARY —— ip-192.168.11.200 IP-192.168.11.200 OSF 1 rhel01 MACHINE NETWORK ADDRESSES/DEVICE STATE PRIO rhel02 TCP 192.168.10.101/192.168.10.102 ALIVE 1 rhel02 TCP 192.168.11.101/192.168.11.102 ALIVE 2 |
| [root@rhel01 ~]# /opt/LifeKeeper/bin/perform_action -t ip-192.168.11.200 -a restore BEGIN restore of “ip-192.168.11.200” END successful restore of “ip-192.168.11.200” |
44.アクティブサーバからスタンバイサーバにIPアドレスリソースを拡張します。
| [root@rhel01 ~]# /opt/LifeKeeper/bin/lkcli resource extend ip --tag ip-192.168.11.200 --dest rhel02 --ipaddr 192.168.11.200 Building independent resource list Checking quorum status Quorum does not seem to be installed on this server, continuing Checking existence of extend and canextend scripts Checking extendability for ip-192.168.11.200 Pre Extend checks were successful Extending resource instances for ip-192.168.11.200 Creating dependencies Setting switchback type for hierarchy Creating equivalencies LifeKeeper Admin Lock (ip-192.168.11.200) Released Hierarchy successfully extended |
45.アクティブサーバからスタンバイサーバにPINGリストを拡張します。
| [root@rhel01 ~]# /opt/LifeKeeper/bin/lkcli resource config ip --tag ip-192.168.11.200 --pinglist 192.168.11.1 --remote rhel02 Saving new ping list for subnet 192.168.11.0: |
46.スタンバイサーバにIPアドレスリソースが反映されていることを確認します。
| [root@rhel02 ~]# /opt/LifeKeeper/bin/lcdstatus -e BACKUP TAG ID STATE PRIO PRIMARY —— ip-192.168.11.200 IP-192.168.11.200 OSU 10 rhel01 MACHINE NETWORK ADDRESSES/DEVICE STATE PRIO rhel01 TCP 192.168.10.102/192.168.10.101 ALIVE 1 rhel01 TCP 192.168.11.102/192.168.11.101 ALIVE 2 |
47.スタンバイサーバにPINGリストが反映されていることを確認します。
| [root@rhel02 ~]# cat /opt/LifeKeeper/subsys/comm/resources/ip/pinglist.192.168.11.0 192.168.11.1 |
48.続けて、データレプリケーションリソースを作成していきます。
アクティブサーバでレプリケーション対象がマウントされていることを確認します。
| [root@rhel01 ~]# mount | grep /kdump /dev/sdb1 on /kdump type xfs (rw,relatime,seclabel,attr2,inode64,logbufs=8,logbsize=32k,noquota) |
49.スタンバイサーバでレプリケーション対象がマウントされていないことを確認します。
| [root@rhel02 ~]# mount | grep /kdump [root@rhel02 ~]# fdisk -l /dev/sdb1 ディスク /dev/sdb1: 99 MiB, 103809024 バイト, 202752 セクタ 単位: セクタ (1 * 512 = 512 バイト) セクタサイズ (論理 / 物理): 512 バイト / 512 バイト I/O サイズ (最小 / 推奨): 512 バイト / 512 バイト |
50.アクティブサーバでデータレプリケーションリソースを作成します。
| [root@rhel01 ~]# /opt/LifeKeeper/bin/lkcli resource create dk --tag datarep-/kdump --mode synchronous --bitmap /opt/LifeKeeper/bitmap__kdump --hierarchy existing --mount_point /kdump --fstag /kdump BEGIN create of “datarep-/kdump” /dev/sdb1 is configured to be mirrored using /dev/md0 END successful create of “datarep-/kdump” mount -t xfs -orw,seclabel,relatime,attr2,inode64,logbufs=8,logbsize=32k,noquota /dev/md0 /kdump devicehier: Using /opt/LifeKeeper/lkadm/subsys/scsi/netraid/bin/devicehier to construct the hierarchy |
51.アクティブサーバでデータレプリケーションリソースが作成されていることを確認します。
| [root@rhel01 ~]# /opt/LifeKeeper/bin/lcdstatus -e BACKUP TAG ID STATE PRIO PRIMARY rhel02 ip-192.168.11.200 IP-192.168.11.200 ISP 1 rhel01 rhel02 /kdump /kdump ISP 1 rhel01 rhel02 datarep-/kdump 1ATA_VBOX_HARDDISK_VBe0725981-3d008a14-1 ISP 1 rhel01 MACHINE NETWORK ADDRESSES/DEVICE STATE PRIO rhel02 TCP 192.168.10.101/192.168.10.102 ALIVE 1 rhel02 TCP 192.168.11.101/192.168.11.102 ALIVE 2 |
52.アクティブサーバからスタンバイサーバにデータレプリケーションリソースを拡張します。
| [root@rhel01 ~]# /opt/LifeKeeper/bin/lkcli resource extend dk --tag datarep-/kdump --dest rhel02 --mode synchronous --bitmap /opt/LifeKeeper/bitmap__kdump --fstag /kdump --device /dev/sdb1 --laddr 192.168.10.101 --raddr 192.168.10.102 Building independent resource list Checking quorum status Quorum does not seem to be installed on this server, continuing Checking existence of extend and canextend scripts Checking extendability for datarep-/kdump Checking extendability for /kdump Pre Extend checks were successful Extending resource instances for datarep-/kdump extend datarep-/kdump/rhel01 -> datarep-/kdump/rhel02 Creating dependencies Setting switchback type for hierarchy Creating equivalencies LifeKeeper Admin Lock (/kdump) Released Hierarchy successfully extended Extending resource instances for /kdump Creating dependencies Setting switchback type for hierarchy Creating equivalencies LifeKeeper Admin Lock (/kdump) Released Hierarchy successfully extended |
53.スタンバイサーバにデータレプリケーションリソースが反映されていることを確認します。
| [root@rhel02 ~]# /opt/LifeKeeper/bin/lcdstatus -e BACKUP TAG ID STATE PRIO PRIMARY —— ip-192.168.11.200 IP-192.168.11.200 OSU 10 rhel01 —— /kdump /kdump OSU 10 rhel01 —— datarep-/kdump 1ATA_VBOX_HARDDISK_VB05620f4b-02891c76-1 OSU 10 rhel01 MACHINE NETWORK ADDRESSES/DEVICE STATE PRIO rhel01 TCP 192.168.10.102/192.168.10.101 ALIVE 1 rhel01 TCP 192.168.11.102/192.168.11.101 ALIVE 2 |
54.アクティブサーバからリソース階層を作成します。
リソース「datarep-/kdump」の下位にリソース「ip-192.168.11.200」を指定します。
| [root@rhel01 ~]# /opt/LifeKeeper/bin/lkcli dependency create --parent datarep-/kdump --child ip-192.168.11.200 Creating the dependency on the server rhel01 Creating the dependency on the server rhel02 The dependency creation was successful |
55.リソース階層が作成できたことを確認します。
| [root@rhel01 ~]# /opt/LifeKeeper/bin/lcdstatus -e BACKUP TAG ID STATE PRIO PRIMARY rhel02 /kdump /kdump ISP 1 rhel01 rhel02 datarep-/kdump 1ATA_VBOX_HARDDISK_VBe0725981-3d008a14-1 ISP 1 rhel01 rhel02 ip-192.168.11.200 IP-192.168.11.200 ISP 1 rhel01 MACHINE NETWORK ADDRESSES/DEVICE STATE PRIO rhel02 TCP 192.168.10.101/192.168.10.102 ALIVE 1 rhel02 TCP 192.168.11.101/192.168.11.102 ALIVE 2 |
| [root@rhel02 ~]# /opt/LifeKeeper/bin/lcdstatus -e BACKUP TAG ID STATE PRIO PRIMARY —— /kdump /kdump OSU 10 rhel01 —— datarep-/kdump 1ATA_VBOX_HARDDISK_VB05620f4b-02891c76-1 OSU 10 rhel01 —— ip-192.168.11.200 IP-192.168.11.200 OSU 10 rhel01 MACHINE NETWORK ADDRESSES/DEVICE STATE PRIO rhel01 TCP 192.168.10.102/192.168.10.101 ALIVE 1 rhel01 TCP 192.168.11.102/192.168.11.101 ALIVE 2 |
56.念のため、スタンバイサーバにスイッチオーバーを実施してみます。
| [root@rhel02 ~]# /opt/LifeKeeper/bin/perform_action -t /kdump -a restore BEGIN restore of “ip-192.168.11.200” END successful restore of “ip-192.168.11.200” BEGIN restore of “datarep-/kdump” /dev/sdb1 is configured to be mirrored using /dev/md0 Resource “/kdump” is “OSU”. The mirror “datarep-/kdump” will wait to replicate data until all resources in the hierarchy of type “filesys” are in-service. To replicate data immediately run: “/opt/LifeKeeper/bin/mirror_action datarep-/kdump resume” on “rhel02” (see “LKDR_WAIT_TO_RESYNC” in /etc/default/LifeKeeper). END successful restore of “datarep-/kdump” BEGIN restore of /kdump mounting file system /kdump mount -txfs -orw,relatime,seclabel,attr2,inode64,logbufs=8,logbsize=32k,noquota /dev/md0 /kdump File system /kdump has been successfully mounted. END successful restore of /kdump |
57.問題なくスイッチオーバーできることが確認できました。
| [root@rhel02 ~]# /opt/LifeKeeper/bin/lcdstatus -e BACKUP TAG ID STATE PRIO PRIMARY —— /kdump /kdump ISP 10 rhel01 —— datarep-/kdump 1ATA_VBOX_HARDDISK_VB05620f4b-02891c76-1 ISP 10 rhel01 —— ip-192.168.11.200 IP-192.168.11.200 ISP 10 rhel01 MACHINE NETWORK ADDRESSES/DEVICE STATE PRIO rhel01 TCP 192.168.10.102/192.168.10.101 ALIVE 1 rhel01 TCP 192.168.11.102/192.168.11.101 ALIVE 2 |
| [root@rhel01 ~]# /opt/LifeKeeper/bin/lcdstatus -e BACKUP TAG ID STATE PRIO PRIMARY rhel02 /kdump /kdump OSU 1 rhel01 rhel02 datarep-/kdump 1ATA_VBOX_HARDDISK_VBe0725981-3d008a14-1 OSU 1 rhel01 rhel02 ip-192.168.11.200 IP-192.168.11.200 OSU 1 rhel01 MACHINE NETWORK ADDRESSES/DEVICE STATE PRIO rhel02 TCP 192.168.10.101/192.168.10.102 ALIVE 1 rhel02 TCP 192.168.11.101/192.168.11.102 ALIVE 2 |
さいごに
クラウド環境では、構築担当にGUIログインをさせたくない等の要望があるケースも少なくありません。
GUI接続がネックでLifeKeeper for Linuxの導入を躊躇していたユーザーの助けになれば幸いです。
詳しい内容をお知りになりたいかたは、以下のバナーからSCSKLifekeeper公式サイトまで
![]()