
こんにちは、広野です。
AWS Cloud9 に代わる、使い勝手の良い IDE on AWS を作れないものか、、、日々模索しています。
今回は、code-server を HTTPS 公開して MFA 認証を付ける構成の実装編として AWS CloudFormation テンプレートを紹介します。
前回の記事
背景やアーキテクチャ説明については、前回記事をご覧ください。
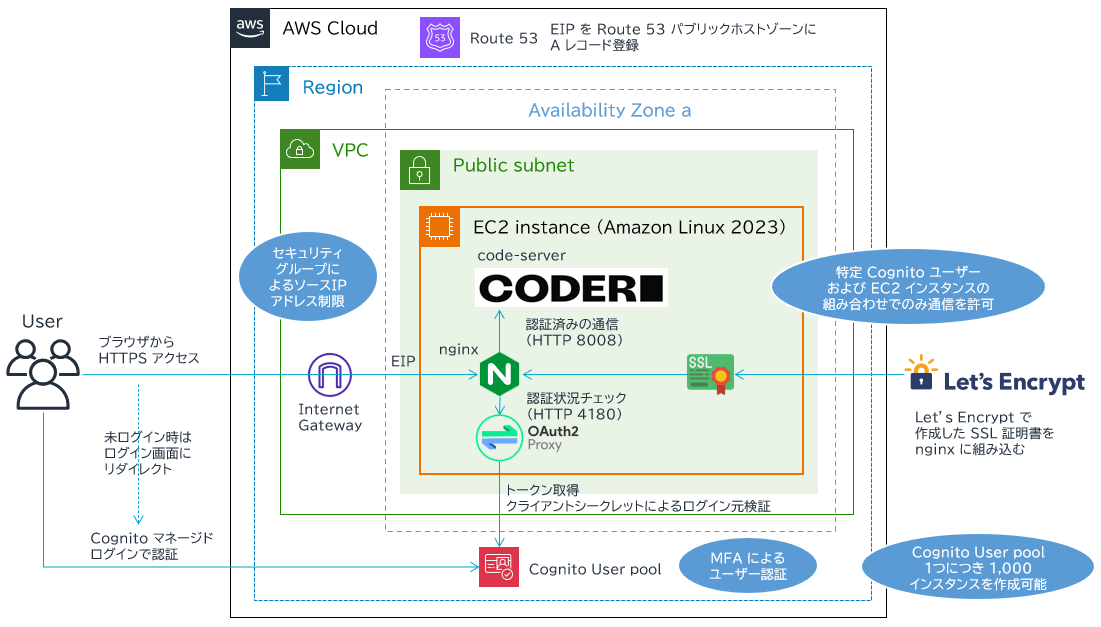
アーキテクチャ
前回記事からの再掲で、図を載せておきます。
AWS CloudFormation テンプレート
テンプレートは大きく 2 つに分かれています。
- ユーザー共通で使用する Amazon Cognito ユーザープール 【既存ユーザープールも条件付きで使用可】
- ユーザー単位で作成する Amazon EC2 インスタンス、他
以下は本テンプレートを使用する際に前提として必要となるリソースです。
- Amazon Route 53 パブリックホストゾーン: 証明書作成やレコード登録に必要
- Amazon VPC: 既存のものを使用する想定、パブリックサブネットが必要
- Amazon SES ID および 設定セット: Amazon SES で Amazon Cognito からの通知メールを送るために必要
本記事のテンプレートを加工すれば 既存の Amazon Cognito ユーザープールを使用可能ですが、メールアドレスを属性として持っていること、Amazon Cognito マネージドログインのドメイン設定ができていることが前提となります。Amazon Cognito ID プールは不要です。
Amazon SES に関する説明は以下の記事をご覧ください。
AWS CloudFormation テンプレートの記述に関する補足は # コメントでインラインで追加します。
【ユーザー共通】Amazon Cognito ユーザープール
他の記事でも紹介していますが、より簡略化した設定になっています。セルフサインアップ可能なメールアドレスをドメイン名で制限するための AWS Lambda 関数を組み込んでいます。
AWSTemplateFormatVersion: 2010-09-09
Description: The CloudFormation template that creates a Cognito user pool with Managed Login, self-signup by email, and forced MFA.

# ------------------------------------------------------------#
# Input Parameters
# ------------------------------------------------------------#
Parameters:
  SystemName:
    Type: String
    Description: System name. use lower case only. (e.g. example)
    Default: example
    MaxLength: 10
    MinLength: 1

  SubName:
    Type: String
    Description: System sub name. use lower case only. (e.g. prod or dev)
    Default: dev
    MaxLength: 10
    MinLength: 1

  SesId:
    Type: String
    Description: Amazon SES ID for sending emails. (email addreess or domain)
    Default: xxxx.xxx
    MaxLength: 100
    MinLength: 5

  SesConfigurationSet:
    Type: String
    Description: Amazon SES configuration set for sending emails.
    Default: xxxxxxxxxxxxxxxx
    MaxLength: 100
    MinLength: 5

  CognitoReplyTo:
    Type: String
    Description: Cognito Reply-to email address. (e.g. xxx@xxx.xxx)
    Default: xxxxx@xxx.xxx
    AllowedPattern: "[^\\s@]+@[^\\s@]+\\.[^\\s@]+"

  CognitoEmailFrom:
    Type: String
    Description: Cognito e-mail from address. (e.g. xxx@xxx.xxx)
    Default: xxxxx@xxx.xxx
    AllowedPattern: "[^\\s@]+@[^\\s@]+\\.[^\\s@]+"

  AllowedUserEmailDomains:
    Description: Domain list to allow user sign up. Each domains must be comma delimited and double quoted.
    Type: String
    Default: '"xxx.xxx"'

Metadata:
  AWS::CloudFormation::Interface:
    ParameterGroups:
      - Label:
          default: "General Configuration"
        Parameters:
          - SystemName
          - SubName
      - Label:
          default: "Email Configuration"
        Parameters:
          - SesId
          - SesConfigurationSet
          - CognitoReplyTo
          - CognitoEmailFrom
      - Label:
          default: "Security Configuration"
        Parameters:
          - AllowedUserEmailDomains

Resources:
# ------------------------------------------------------------#
# Lambda (triggered from Cognito) Role (IAM)
# ------------------------------------------------------------#
  LambdaTriggeredFromCognitoRole:
    Type: AWS::IAM::Role
    Properties:
      RoleName: !Sub ${SystemName}-LambdaTriggeredFromCognitoRole-${SubName}
      Description: This role grants Lambda functions triggered from Cognito basic priviledges.
      AssumeRolePolicyDocument:
        Version: 2012-10-17
        Statement:
          - Effect: Allow
            Principal:
              Service:
              - lambda.amazonaws.com
            Action:
              - sts:AssumeRole
      Path: /
      ManagedPolicyArns:
        - arn:aws:iam::aws:policy/service-role/AWSLambdaBasicExecutionRole
        - arn:aws:iam::aws:policy/AWSXRayDaemonWriteAccess
        - arn:aws:iam::aws:policy/AmazonCognitoPowerUser

# ------------------------------------------------------------#
# Cognito Lambda Invocation Permission
# ------------------------------------------------------------#
  CognitoLambdaInvocationPermissionPresignup:
    Type: AWS::Lambda::Permission
    Properties:
      FunctionName: !GetAtt LambdaCognitoPresignup.Arn
      Action: lambda:InvokeFunction
      Principal: cognito-idp.amazonaws.com
      SourceAccount: !Sub ${AWS::AccountId}
      SourceArn: !GetAtt UserPool.Arn
    DependsOn:
      - LambdaCognitoPresignup
      - UserPool

  CognitoLambdaInvocationPermissionPostconfirm:
    Type: AWS::Lambda::Permission
    Properties:
      FunctionName: !GetAtt LambdaCognitoPostconfirm.Arn
      Action: lambda:InvokeFunction
      Principal: cognito-idp.amazonaws.com
      SourceAccount: !Sub ${AWS::AccountId}
      SourceArn: !GetAtt UserPool.Arn
    DependsOn:
      - LambdaCognitoPostconfirm
      - UserPool

# ------------------------------------------------------------#
# Cognito
# ------------------------------------------------------------#
  UserPool:
    Type: AWS::Cognito::UserPool
    Properties:
      UserPoolName: !Sub ${SystemName}-${SubName}
      MfaConfiguration: "ON"
      EnabledMfas:
        - SOFTWARE_TOKEN_MFA
      Policies:
        PasswordPolicy:
          MinimumLength: 8
          RequireUppercase: true
          RequireLowercase: true
          RequireNumbers: true
          RequireSymbols: false
          TemporaryPasswordValidityDays: 180
      AccountRecoverySetting:
        RecoveryMechanisms:
          - Name: verified_email
            Priority: 1
      AdminCreateUserConfig:
        AllowAdminCreateUserOnly: false
      AutoVerifiedAttributes:
        - email
      DeviceConfiguration:
        ChallengeRequiredOnNewDevice: false
        DeviceOnlyRememberedOnUserPrompt: false
      EmailConfiguration:
        ConfigurationSet: !Ref SesConfigurationSet
        EmailSendingAccount: DEVELOPER
        From: !Sub "${SystemName}-${SubName} admin <${CognitoEmailFrom}>"
        ReplyToEmailAddress: !Ref CognitoReplyTo
        SourceArn: !Sub arn:aws:ses:${AWS::Region}:${AWS::AccountId}:identity/${SesId}
      EmailVerificationMessage: !Sub "${SystemName}-${SubName} Verification code: {####}"
      EmailVerificationSubject: !Sub "${SystemName}-${SubName} Verification code"
      LambdaConfig:
        PreSignUp: !GetAtt LambdaCognitoPresignup.Arn
        PostConfirmation: !GetAtt LambdaCognitoPostconfirm.Arn
      UsernameAttributes:
        - email
      UsernameConfiguration:
        CaseSensitive: false
      UserPoolAddOns:
        AdvancedSecurityMode: "OFF"
      UserPoolTags:
        Cost: !Sub ${SystemName}-${SubName}

  # この UserPoolDomain 設定は、Amazon Cognito マネージドログインを使用するために必要です。
  # Version 2 つまりマネージドログインを使用する設定にしています。
  # Version 1 だと旧型の hosted UI になります。
  UserPoolDomain:
    Type: AWS::Cognito::UserPoolDomain
    Properties:
      Domain: !Sub ${SystemName}-${SubName}
      ManagedLoginVersion: 2
      UserPoolId: !Ref UserPool

  UserPoolGroupBasic:
    Type: AWS::Cognito::UserPoolGroup
    Properties:
      Description: The User Group for standard users.
      GroupName: BASIC
      Precedence: 101
      UserPoolId: !Ref UserPool

# ------------------------------------------------------------#
# Lambda
# ------------------------------------------------------------#
  LambdaCognitoPresignup:
    Type: AWS::Lambda::Function
    Properties:
      FunctionName: !Sub ${SystemName}-CognitoPresignup-${SubName}
      Description: !Sub Lambda Function triggered from Cognito before user self signup to check the user's email domain for ${SystemName}-${SubName}
      Runtime: python3.13
      Timeout: 3
      MemorySize: 128
      Role: !GetAtt LambdaTriggeredFromCognitoRole.Arn
      Handler: index.lambda_handler
      Tags:
        - Key: Cost
          Value: !Sub ${SystemName}-${SubName}
      Code:
        ZipFile: !Sub |
          import re
          def lambda_handler(event, context):
            try:
              print(event)
              triggersource = event['triggerSource']
              email = event['request']['userAttributes']['email']
              print(email)
              if triggersource == 'PreSignUp_SignUp':
                print('via self signup')
                domain = email.split('@')[1]
                allowedDomains = [ ${AllowedUserEmailDomains} ]
                if domain in allowedDomains:
                  print('allowed domain and email account')
                  return event
                else:
                  print('prohibited domain')
                  return None
              else:
                print('via admin console')
                return event
            except Exception as e:
              print(str(e))
    DependsOn: LambdaTriggeredFromCognitoRole

  LambdaCognitoPostconfirm:
    Type: AWS::Lambda::Function
    Properties:
      FunctionName: !Sub ${SystemName}-CognitoPostconfirm-${SubName}
      Description: !Sub Lambda Function triggered from Cognito after user confirmation to add the user in BASIC group for ${SystemName}-${SubName}
      Runtime: python3.13
      Timeout: 3
      MemorySize: 128
      Role: !GetAtt LambdaTriggeredFromCognitoRole.Arn
      Handler: index.lambda_handler
      Tags:
        - Key: Cost
          Value: !Sub ${SystemName}-${SubName}
      Code:
        ZipFile: !Sub |
          import boto3
          client = boto3.client('cognito-idp', '${AWS::Region}')
          def lambda_handler(event, context):
            USERPOOLID = event['userPoolId']
            USERNAME = event['userName']
            try:
              print(event)
              res = client.admin_add_user_to_group(
                UserPoolId=USERPOOLID,
                Username=USERNAME,
                GroupName='BASIC'
              )
              return event
            except Exception as e:
              print(str(e))
    DependsOn: LambdaTriggeredFromCognitoRole

# ------------------------------------------------------------#
# Output Parameters この出力は次のテンプレートで使用します。
# ------------------------------------------------------------#
Outputs:
# Cognito
  CognitoUserPoolId:
    Value: !Ref UserPool
    Export:
      Name: !Sub CognitoUserPoolId-${SystemName}-${SubName}
  CognitoUserPoolArn:
    Value: !GetAtt UserPool.Arn
    Export:
      Name: !Sub CognitoUserPoolArn-${SystemName}-${SubName}
  CognitoUserPoolProviderName:
    Value: !GetAtt UserPool.ProviderName
    Export:
      Name: !Sub CognitoUserPoolProviderName-${SystemName}-${SubName}
  CognitoUserPoolProviderUrl:
    Value: !GetAtt UserPool.ProviderURL
    Export:
      Name: !Sub CognitoUserPoolProviderUrl-${SystemName}-${SubName}
【ユーザー単位】Amazon EC2 インスタンス、他付属リソース
ユーザー単位で Amazon EC2 インスタンスを作成するとともに、その EC2 インスタンス専用の Amazon Cognito ユーザープール「アプリケーションクライアント」を作成します。アプリケーションクライアントは上述のテンプレートで作成した Amazon Cognito ユーザープールに関連付けます。ここで作成したアプリケーションクライアントにはクライアントシークレットを作成しており、その Amazon EC2 インスタンスしか知りません。(まあ、マネジメントコンソールを見てしまえばわかるんですが、外部の人が簡単にわかるものではない) それを知ろうとするために、Amazon Cognito ユーザープールを参照可能な IAM ロール権限を付与しています。
Amazon EC2 インスタンスには Elastic IP アドレスを割り当て、それを指定した Amazon Route 53 パブリックホストゾーンに A レコード登録します。FQDN に合わせた SSL 証明書を Let’s Encrypt で作成します。Let’s Encrypt に証明書を作成依頼するときの認証方法は DNS-01 という方式を選定しています。これは Amazon Route 53 パブリックホストゾーンに登録した認証用レコードを Let’s Encrypt のシステム側が確認することでドメインの所有者確認をする方法です。そのため、この EC2 インスタンスの IAM ロールにレコード登録可能な権限を付与しています。
などなど、いろいろと複合技を仕掛けています。内容が盛り沢山で既に私もおなかいっぱいです。
テンプレート内にインラインの説明コメントが多くなると思いますが、ご容赦ください。
AWSTemplateFormatVersion: "2010-09-09"
Description: The CloudFormation template that creates an Amazon Linux 2023 x86_64 EC2 instance with code-server and Cognito authentication.

# ------------------------------------------------------------#
# Input Parameters
# ------------------------------------------------------------#
Parameters:
  SystemName:
    Type: String
    Description: System name. use lower case only. (e.g. example)
    Default: example
    MaxLength: 10
    MinLength: 1

  SubName:
    Type: String
    Description: System sub name. use lower case only. (e.g. prod or dev)
    Default: dev
    MaxLength: 10
    MinLength: 1

  DomainName:
    Type: String
    Description: Domain name for URL. xxxxx.xxx
    Default: example.com
    AllowedPattern: "^(?!-)(?:[a-zA-Z0-9-]{0,62}[a-zA-Z0-9])(?:\\.(?!-)(?:[a-zA-Z0-9-]{0,62}[a-zA-Z0-9]))*$"

  # VPC やパブリックサブネットは既存のものを選択してください。
  VpcId:
    Type: AWS::EC2::VPC::Id
    Description: Choose a existing VPC ID you deploy the EC2 instance in.

  InstanceSubnet:
    Type: AWS::EC2::Subnet::Id
    Description: Choose an existing Public Subnet ID you deploy the EC2 instance in.

  # EC2 インスタンスタイプは適宜変更してください。節約のため t3a にしているだけです。medium でもやや重いと思います。
  InstanceType:
    Type: String
    Description: EC2 instance type (AMD/t3a)
    Default: t3a.medium
    AllowedValues:
      - t3a.medium
      - t3a.large
      - t3a.xlarge

  # EBS のサイズも適宜変更してください。
  InstanceVolumeSize:
    Type: Number
    Description: The volume size in GB
    Default: 20

  # アクセスを許可するソースグローバル IP アドレスのサブネットを指定してください。
  AllowedSubnet:
    Type: String
    Description: Allowed source IPv4 subnet and subnet mask. (e.g. xxx.xxx.xxx.xxx/32)
    Default: 111.111.111.111/32
    AllowedPattern: "^((25[0-5]|2[0-4][0-9]|1?[0-9]{1,2})\\.){3}(25[0-5]|2[0-4][0-9]|1?[0-9]{1,2})\\/([0-9]|[1-2][0-9]|3[0-2])$"

  TimeZone:
    Type: String
    Description: The specified time zone.
    Default: Asia/Tokyo
    AllowedPattern: "^(Africa|America|Antarctica|Arctic|Asia|Atlantic|Australia|Europe|Indian|Pacific)/[A-Za-z0-9_/-]+$"

  Route53HostZoneId:
    Type: String
    Description: Route 53 public host zone ID for the SSL certificate.
    Default: XXXXXXXXXXXXXXXXXXXX
    MaxLength: 30
    MinLength: 1

  YourId:
    Type: String
    Description: The individual instance id (or number) specified from the administrator.
    Default: client01
    MaxLength: 20
    MinLength: 1

  # ここで指定したメールアドレスで Amazon Cognito ユーザーを作成する必要があります。
  YourEmail:
    Type: String
    Description: Your email address for the access control.
    Default: xxx@xxx.xxx
    AllowedPattern: "[^\\s@]+@[^\\s@]+\\.[^\\s@]+"

  # OAuth2 Proxy のバージョンを入れてください。7.12.0 で動作確認済みですが、
  # バージョンが変わるとコマンド仕様が変わる恐れがあります。
  Oauth2ProxyVersion:
    Type: String
    Description: oauth2-proxy version.
    Default: 7.12.0
    MaxLength: 10
    MinLength: 4

Metadata:
  AWS::CloudFormation::Interface:
    ParameterGroups:
      - Label:
          default: "General Configuration"
        Parameters:
          - SystemName
          - SubName
          - YourId
          - YourEmail
      - Label:
          default: "Domain Configuration"
        Parameters:
          - DomainName
          - Route53HostZoneId
      - Label:
          default: "Network Configuration"
        Parameters:
          - VpcId
          - InstanceSubnet
          - AllowedSubnet
          - Oauth2ProxyVersion
      - Label:
          default: "EC2 Configuration"
        Parameters:
          - InstanceType
          - InstanceVolumeSize
      - Label:
          default: "OS Configuration"
        Parameters:
          - TimeZone

Resources:
# ------------------------------------------------------------#
# EC2 Launch template
# ------------------------------------------------------------#
  EC2LaunchTemplate:
    Type: AWS::EC2::LaunchTemplate
    Properties:
      LaunchTemplateName: !Sub codeserver-${SystemName}-${SubName}-${YourId}
      LaunchTemplateData:
        InstanceType: !Ref InstanceType
        # 使用する AMI は Amazon Linux 2023 x86_64 の最新版なのですが、スタックを変更するときに
        # 新しい AMI ID がリリースされていると EC2 インスタンスを再作成してしまうので注意が必要です。
        # 正直この指定は良くないと思っていますが楽さに負けて使ってしまいます。
        ImageId: >-
          {{resolve:ssm:/aws/service/ami-amazon-linux-latest/al2023-ami-kernel-default-x86_64}}
        BlockDeviceMappings:
          - Ebs:
              VolumeSize: !Ref InstanceVolumeSize
              VolumeType: gp3
              DeleteOnTermination: true
              Encrypted: true
            DeviceName: /dev/xvda
        NetworkInterfaces:
          - SubnetId: !Ref InstanceSubnet
            Groups:
              - !Ref Ec2SecurityGroup
            DeviceIndex: 0
            AssociatePublicIpAddress: true
        MetadataOptions:
          HttpTokens: required
        Monitoring:
          Enabled: true
        TagSpecifications:
          - ResourceType: volume
            Tags:
              - Key: Cost
                Value: !Sub ${SystemName}-${SubName}
    DependsOn:
      - Ec2SecurityGroup

# ------------------------------------------------------------#
# EC2 Security Group
# ------------------------------------------------------------#
  Ec2SecurityGroup:
    Type: AWS::EC2::SecurityGroup
    Properties:
      VpcId: !Ref VpcId
      GroupDescription: Allow HTTPS access from specified subnets
      SecurityGroupIngress:
        # セキュリティグループは 443 だけ開けていますが、必要に応じて変更してください。
        - Description: Allow HTTPS from the specified client
          FromPort: 443
          IpProtocol: tcp
          ToPort: 443
          CidrIp: !Ref AllowedSubnet
      SecurityGroupEgress:
        - Description: Allow all outbound traffic
          IpProtocol: -1
          CidrIp: 0.0.0.0/0
      Tags:
        - Key: Cost
          Value: !Sub ${SystemName}-${SubName}
        - Key: Name
          Value: !Sub SG-codeserver-${SystemName}-${SubName}-${YourId}

# ------------------------------------------------------------#
# EC2 Role / Instance Profile (IAM)
# ------------------------------------------------------------#
  Ec2Role:
    Type: AWS::IAM::Role
    Properties:
      RoleName: !Sub Ec2Role-codeserver-${SystemName}-${SubName}-${YourId}
      Description: This role allows EC2 instance to invoke S3 and SSM.
      AssumeRolePolicyDocument:
        Version: 2012-10-17
        Statement:
          - Effect: Allow
            Principal:
              Service:
                - ec2.amazonaws.com
            Action:
              - sts:AssumeRole
      Path: /
      ManagedPolicyArns:
        # Session Manager で CUI ログインできるようにしています。トラブルシューティング時に。
        - arn:aws:iam::aws:policy/AmazonSSMManagedInstanceCore
        # AWS CodeCommit リポジトリにアクセスできるようにしています。
        - arn:aws:iam::aws:policy/AWSCodeCommitPowerUser
        - arn:aws:iam::aws:policy/CloudWatchAgentServerPolicy
      Policies:
        - PolicyName: !Sub Ec2Policy-codeserver-${SystemName}-${SubName}-${YourId}
          PolicyDocument:
            Version: 2012-10-17
            Statement:
              # Amazon Q Developer の権限を付けています。
              - Effect: Allow
                Action:
                  - codewhisperer:GenerateRecommendations
                Resource: "*"
              # Amazon Route 53 の必要な権限です。Let's Encrypt の SSL 証明書作成に必要です。
              - Effect: Allow
                Action:
                  - route53:ListHostedZones
                  - route53:GetChange
                Resource:
                  - "*"
              - Effect: Allow
                Action:
                  - route53:ChangeResourceRecordSets
                Resource:
                  - !Sub arn:aws:route53:::hostedzone/${Route53HostZoneId}
              # Amazon Cognito ユーザープールアプリケーションクライアントのクライアントシークレット取得用です。
              - Effect: Allow
                Action:
                  - cognito-idp:DescribeUserPoolClient
                Resource:
                  - Fn::ImportValue:
                      !Sub CognitoUserPoolArn-${SystemName}-${SubName}

  Ec2InstanceProfile:
    Type: AWS::IAM::InstanceProfile
    Properties:
      InstanceProfileName: !Ref Ec2Role
      Path: /
      Roles:
        - !Ref Ec2Role
    DependsOn:
      - Ec2Role

# ------------------------------------------------------------#
# Elastic IP address for EC2 instance
# ------------------------------------------------------------#
  EipEc2:
    Type: AWS::EC2::EIP
    Properties:
      Domain: vpc
      Tags:
        - Key: Cost
          Value: !Sub ${SystemName}-${SubName}
        - Key: Name
          Value: !Sub eip-codeserver-${SystemName}-${SubName}-${YourId}

# ------------------------------------------------------------#
# EIP Association
# ------------------------------------------------------------#
  EIPAssociation:
    Type: AWS::EC2::EIPAssociation
    Properties:
      AllocationId: !GetAtt EipEc2.AllocationId
      InstanceId: !Ref Ec2Instance
    DependsOn:
      - Ec2Instance
      - EipEc2

# ------------------------------------------------------------#
# EC2
# ------------------------------------------------------------#
  Ec2Instance:
    Type: AWS::EC2::Instance
    Properties:
      IamInstanceProfile: !Ref Ec2InstanceProfile
      LaunchTemplate:
        LaunchTemplateId: !Ref EC2LaunchTemplate
        Version: !GetAtt EC2LaunchTemplate.LatestVersionNumber
      UserData:
        Fn::Base64: !Sub
          - |
            #!/bin/bash
            set -euxo pipefail
            # Locale & timezone
            timedatectl set-timezone ${TimeZone}
            # Install packages
            dnf update -y
            # とりあえず Git, Node.js, Python をインストールしています。
            dnf install -y git nodejs gcc make zlib-devel bzip2-devel xz-devel curl-devel libffi-devel python3.13 python3-pip python3-boto3 python3-pytest
            # Install code-server
            export HOME=/home/ec2-user
            curl -fsSL https://code-server.dev/install.sh | bash
            mkdir -p /home/ec2-user/.config/code-server
            mkdir -p /home/ec2-user/.local/share/code-server/User
            mkdir -p /home/ec2-user/environment
            chown -R ec2-user:ec2-user /home/ec2-user/.config /home/ec2-user/.local /home/ec2-user/environment
            # Update code-server config
            # code-server は 8008 ポートで起動しています。よく使う 80 や 8080 と重複しないようにするため。
            # code-server ネイティブの認証は無し(none)にしています。Amazon Cognito を使用するため。
            tee /home/ec2-user/.config/code-server/config.yaml << EOF
            bind-addr: 127.0.0.1:8008
            auth: none
            cert: false
            EOF
            chown ec2-user:ec2-user /home/ec2-user/.config/code-server/config.yaml
            tee /home/ec2-user/.local/share/code-server/User/settings.json << EOF
            {
              "extensions.autoUpdate": false,
              "extensions.autoCheckUpdates": false,
              "terminal.integrated.cwd": "/home/ec2-user/environment",
              "telemetry.telemetryLevel": "off",
              "security.workspace.trust.startupPrompt": "never",
              "security.workspace.trust.enabled": false,
              "security.workspace.trust.banner": "never",
              "security.workspace.trust.emptyWindow": false,
              "editor.indentSize": "tabSize",
              "editor.tabSize": 2,
              "python.testing.pytestEnabled": true,
              "auto-run-command.rules": [
                {
                  "command": "workbench.action.terminal.new"
                }
              ]
            }
            EOF
            chown ec2-user:ec2-user /home/ec2-user/.local/share/code-server/User/settings.json
            # Service start
            systemctl enable --now code-server@ec2-user
            # Create SSL cert
            # Let's Encrypt で SSL 証明書を作成するためのモジュール、Amazon Route 53 対応のものをインストールしています。
            dnf install -y certbot python3-certbot-dns-route53
            # 証明書を DNS-01 という認証方式で作成するコマンドです。
            certbot certonly --dns-route53 -d codeserver-${SystemName}-${SubName}-${YourId}.${DomainName} --agree-tos -m ${YourEmail} --non-interactive --preferred-challenges dns-01
            # Install oauth2-proxy
            curl -L -o /tmp/oauth2-proxy.tar.gz https://github.com/oauth2-proxy/oauth2-proxy/releases/download/v${Oauth2ProxyVersion}/oauth2-proxy-v${Oauth2ProxyVersion}.linux-amd64.tar.gz
            tar -xzf /tmp/oauth2-proxy.tar.gz -C /tmp
            cp /tmp/oauth2-proxy-v${Oauth2ProxyVersion}.linux-amd64/oauth2-proxy /usr/local/bin/
            chmod +x /usr/local/bin/oauth2-proxy
            # ここで、Amazon Cognito ユーザープールアプリケーションクライアントのクライアントシークレットを取得します。
            CLIENT_SECRET=$(aws cognito-idp describe-user-pool-client \
            --user-pool-id ${UserPoolId} \
            --client-id ${UserPoolAppClient} \
            --region ${AWS::Region} \
            --query 'UserPoolClient.ClientSecret' \
            --output text)
            # クッキーシークレットを生成します。
            COOKIE_SECRET=$(python3.13 -c 'import os,base64; print(base64.urlsafe_b64encode(os.urandom(32)).decode())')
            mkdir -p /etc/oauth2-proxy
            chown ec2-user:ec2-user /etc/oauth2-proxy
            chmod 700 /etc/oauth2-proxy
            # 以下は自分のメールアドレス以外ではログインを許可しない設定です。
            echo ${YourEmail} > /etc/oauth2-proxy/allowed_emails.txt
            chmod 600 /etc/oauth2-proxy/allowed_emails.txt
            chown ec2-user:ec2-user /etc/oauth2-proxy/allowed_emails.txt
            # 以下は OAuth2 Proxy をサービスとして起動するための設定です。
            # Amazon Cognito とやり取りするために、この通り記述する必要があります。
            cat <<EOF > /etc/systemd/system/oauth2-proxy.service
            [Unit]
            Description=oauth2-proxy
            After=network.target
            [Service]
            Type=simple
            Environment=CLIENT_SECRET=${!CLIENT_SECRET}
            Environment=COOKIE_SECRET=${!COOKIE_SECRET}
            ExecStart=/usr/local/bin/oauth2-proxy \
            --provider=oidc \
            --oidc-issuer-url=${UserPoolProviderUrl} \
            --client-id=${UserPoolAppClient} \
            --client-secret=$CLIENT_SECRET \
            --redirect-url=https://codeserver-${SystemName}-${SubName}-${YourId}.${DomainName}/oauth2/callback \
            --login-url=https://${SystemName}-${SubName}.auth.${AWS::Region}.amazoncognito.com/oauth2/authorize \
            --profile-url=https://${SystemName}-${SubName}.auth.${AWS::Region}.amazoncognito.com/oauth2/userInfo \
            --redeem-url=https://${SystemName}-${SubName}.auth.${AWS::Region}.amazoncognito.com/oauth2/token \
            --scope=openid \
            --cookie-secure=true \
            --cookie-expire=72h \
            --cookie-refresh=1h \
            --cookie-secret=$COOKIE_SECRET \
            --authenticated-emails-file=/etc/oauth2-proxy/allowed_emails.txt \
            --http-address=127.0.0.1:4180
            Restart=on-failure
            User=ec2-user
            Group=ec2-user
            [Install]
            WantedBy=multi-user.target
            EOF
            systemctl daemon-reload
            systemctl enable --now oauth2-proxy
            # Install nginx
            # nginx は code-server を HTTPS 化するためにインストールします。SSL 証明書はここで使われます。
            dnf install -y nginx
            systemctl enable --now nginx
            mkdir -p /etc/nginx/ssl
            chmod 700 /etc/nginx/ssl
            cp /etc/letsencrypt/live/codeserver-${SystemName}-${SubName}-${YourId}.${DomainName}/fullchain.pem /etc/nginx/ssl/nginx-chain.crt
            cp /etc/letsencrypt/live/codeserver-${SystemName}-${SubName}-${YourId}.${DomainName}/privkey.pem /etc/nginx/ssl/nginx.key
            chmod 644 /etc/nginx/ssl/nginx-chain.crt
            chmod 600 /etc/nginx/ssl/nginx.key
            # nginx が OAuth2 Proxy とやり取りするためにこの通りパスの設定をする必要があります。
            # proxy_buffer 系の設定が重要で、これが大きくないとエラーになります。
            tee /etc/nginx/conf.d/codeserver.conf << EOF
            server {
              listen 443 ssl;
              server_name codeserver-${SystemName}-${SubName}-${YourId}.${DomainName};
              large_client_header_buffers 4 16k;
              ssl_certificate_key /etc/nginx/ssl/nginx.key;
              ssl_certificate /etc/nginx/ssl/nginx-chain.crt;
              location / {
                auth_request /oauth2/auth;
                error_page 401 = /oauth2/sign_in;
                proxy_pass http://127.0.0.1:8008;
                proxy_http_version 1.1;
                proxy_set_header Upgrade \$http_upgrade;
                proxy_set_header Connection "upgrade";
                proxy_set_header Host \$host;
                proxy_set_header X-Real-IP \$remote_addr;
                proxy_set_header X-Forwarded-For \$proxy_add_x_forwarded_for;
                proxy_set_header X-Forwarded-Proto \$scheme;
                proxy_read_timeout 3600s;
                proxy_send_timeout 3600s;
              }
              location /oauth2/ {
                proxy_pass http://127.0.0.1:4180;
                proxy_set_header Host \$host;
                proxy_set_header X-Real-IP \$remote_addr;
                proxy_set_header X-Forwarded-For \$proxy_add_x_forwarded_for;
                proxy_set_header X-Forwarded-Proto \$scheme;
                proxy_set_header X-Auth-Request-Redirect \$request_uri;
                proxy_buffers 16 16k;
                proxy_buffer_size 16k;
              }
              location = /oauth2/auth {
                proxy_pass http://127.0.0.1:4180;
                proxy_set_header Host \$host;
                proxy_set_header X-Real-IP \$remote_addr;
                proxy_set_header X-Scheme \$scheme;
                proxy_set_header Content-Length "";
                proxy_pass_request_body off;
                proxy_buffers 16 16k;
                proxy_buffer_size 16k;
              }
            }
            EOF
            systemctl restart nginx
            # Create cert renew script
            # 以下は Let's Encrypt の SSL 証明書を更新するためのスクリプトです。ec2-user のホームディレクトリに配置します。
            cat << 'EOF' > /home/ec2-user/renew-cert.sh
            #!/bin/bash
            set -e
            sudo certbot renew
            sudo cp -f /etc/letsencrypt/live/codeserver-${SystemName}-${SubName}-${YourId}.${DomainName}/fullchain.pem /etc/nginx/ssl/nginx-chain.crt
            sudo cp -f /etc/letsencrypt/live/codeserver-${SystemName}-${SubName}-${YourId}.${DomainName}/privkey.pem /etc/nginx/ssl/nginx.key
            sudo chmod 644 /etc/nginx/ssl/nginx-chain.crt
            sudo chmod 600 /etc/nginx/ssl/nginx.key
            sudo systemctl restart nginx
            echo "Certificate renewed."
            EOF
            chmod +x /home/ec2-user/renew-cert.sh
            chown ec2-user:ec2-user /home/ec2-user/renew-cert.sh
            # Create sign out file
            # 以下はサインアウト用の URL を md ファイルにして code-server のホームディレクトリに配置します。
            tee /home/ec2-user/environment/signout.md > /dev/null << EOF
            [Sign Out](https://${SystemName}-${SubName}.auth.${AWS::Region}.amazoncognito.com/logout?client_id=${UserPoolAppClient}&logout_uri=https%3A%2F%2Fcodeserver-${SystemName}-${SubName}-${YourId}.${DomainName}%2Foauth2%2Fsign_out)
            EOF
            chown ec2-user:ec2-user /home/ec2-user/environment/signout.md
            chmod 644 /home/ec2-user/environment/signout.md
            # Download Amazon Q Developer CLI
            # Amazon Q Developer CLI のインストーラをダウンロードしています。
            # インストールはサインインが必要なため、ダウンロードにとどめています。
            sudo -i -u ec2-user bash << 'EOF'
            curl --proto '=https' --tlsv1.2 -sSf "https://desktop-release.q.us-east-1.amazonaws.com/latest/q-x86_64-linux.zip" -o "q.zip"
            unzip q.zip
            EOF
            # Install nvm
            # Node.js のバージョン管理ツール nvm をインストールします。
            # インストールは OS 再起動が必要なので最後に入れています。
            # 必要なバージョンを nvm install コマンドで手動で入れましょう。
            sudo -u ec2-user bash -c "curl -o- https://raw.githubusercontent.com/nvm-sh/nvm/v0.40.3/install.sh | bash"
            # Finally, reboot
            reboot
          - UserPoolProviderUrl:
              Fn::ImportValue:
                !Sub CognitoUserPoolProviderUrl-${SystemName}-${SubName}
            UserPoolId:
              Fn::ImportValue:
                !Sub CognitoUserPoolId-${SystemName}-${SubName}
      Tags:
        - Key: Cost
          Value: !Sub ${SystemName}-${SubName}
        - Key: Name
          Value: !Sub codeserver-${SystemName}-${SubName}-${YourId}
    DependsOn:
      - Ec2InstanceProfile
      # Route 53 に Elastic IP アドレスの A レコードが登録されないと Let's Encrypt の SSL 証明書作成が
      # 失敗するので、明示的に DependsOn 設定を入れています。
      - Route53RecordA
      - UserPoolAppClient

# ------------------------------------------------------------#
# Route 53
# ------------------------------------------------------------#
  Route53RecordA:
    Type: AWS::Route53::RecordSet
    Properties:
      HostedZoneName: !Sub ${DomainName}.
      Name: !Sub codeserver-${SystemName}-${SubName}-${YourId}.${DomainName}.
      Type: A
      TTL: 300
      ResourceRecords:
        - !GetAtt EipEc2.PublicIp
    DependsOn: EipEc2

# ------------------------------------------------------------#
# Cognito User Pool App Client
# ------------------------------------------------------------#
  UserPoolAppClient:
    Type: AWS::Cognito::UserPoolClient
    Properties:
      UserPoolId:
        Fn::ImportValue:
          !Sub CognitoUserPoolId-${SystemName}-${SubName}
      ClientName: !Sub ${SystemName}-${SubName}-${YourId}
      GenerateSecret: true
      RefreshTokenValidity: 3
      AccessTokenValidity: 6
      IdTokenValidity: 6
      ExplicitAuthFlows:
        - ALLOW_USER_SRP_AUTH
        - ALLOW_REFRESH_TOKEN_AUTH
      PreventUserExistenceErrors: ENABLED
      SupportedIdentityProviders:
        - COGNITO
      # Amazon Cognito マネージドログインを使用するには、以下の URL 系の設定が必須です。
      # ここの設定は繊細で、EC2 内でコマンド実行している nginx や OAuth2 Proxy の設定ときっちり
      # 合わせる必要があります。
      # 特に LogoutURLs に指定した URL を get パラメータの1つとして完全一致させないと
      # ログアウト時に使用しないとログアウトに失敗します。
      # ここでは意味不明かもしれませんがやってみるとわかります。
      # その他、AuthFlow 系の設定も繊細だと思うので、ここに書いてある通りに書いておかないと
      # 動かなそうな気がします。
      CallbackURLs:
        - !Sub https://codeserver-${SystemName}-${SubName}-${YourId}.${DomainName}/oauth2/callback
      LogoutURLs:
        - !Sub https://codeserver-${SystemName}-${SubName}-${YourId}.${DomainName}/oauth2/sign_out
      DefaultRedirectURI: !Sub https://codeserver-${SystemName}-${SubName}-${YourId}.${DomainName}/oauth2/callback
      AllowedOAuthFlows:
        - code
      AllowedOAuthFlowsUserPoolClient: true
      AllowedOAuthScopes:
        - openid
        - email
        - profile

  # Amazon Cognito マネージドログインを使用する場合、以下の設定が必要になります。
  # デザインを細かくカスタマイズできそうなのですが、大変なので完全デフォルトにしました。
  ManagedLoginBranding:
    Type: AWS::Cognito::ManagedLoginBranding
    Properties:
      ClientId: !Ref UserPoolAppClient
      ReturnMergedResources: true
      UseCognitoProvidedValues: true
      UserPoolId:
        Fn::ImportValue:
          !Sub CognitoUserPoolId-${SystemName}-${SubName}

# ------------------------------------------------------------#
# Output Parameters
# ------------------------------------------------------------#
Outputs:
# EC2
  # 完成した code-server の URL です。
  codeserverUrl:
    Value: !Sub "https://codeserver-${SystemName}-${SubName}-${YourId}.${DomainName}/?folder=/home/ec2-user/environment"
  # ログアウト時にアクセスする URL です。get パラメータがかなり繊細です。
  signoutUrl:
    Value: !Sub "https://${SystemName}-${SubName}.auth.${AWS::Region}.amazoncognito.com/logout?client_id=${UserPoolAppClient}&logout_uri=https%3A%2F%2Fcodeserver-${SystemName}-${SubName}-${YourId}.${DomainName}%2Foauth2%2Fsign_out"
まとめ
いかがでしたでしょうか?
今回の題材は code-server でしたが、他の認証機能のない (または弱い) Web アプリケーションによりセキュアな認証機能を付けたいニーズにぴったりはまると思います。
本件は CloudFormation 化するのに苦労しました。しかし、ユーザーデータスクリプトが dnf install でしばしば失敗するのは勘弁して欲しいです。その度に /var/log/cloud-init-output.log を見るはめになります。とりあえず動くものを作りましたが、今後はもっと信頼性の高い仕組みを作りたいです。AMI 化すればいい、では済まない処理もあるので。
さすがにここまでの内容を独力で作れるわけもなく、生成 AI にかなり助けていただきました。例によって AI の回答のままでは動かないことが多かったので各種ツールのリファレンスと見比べながらの作業を強いられましたが、総合的に見て開発、勉強の両面で非常に効率が良かったことに間違いはないでしょう。
一連の動くコマンドや設定はここにありますので、要件に合わせて部分的に活用いただければと思っております。
本記事が皆様のお役に立てれば幸いです。
雑談
Let’s Encrypt はいいですね。AWS Certificate Manager にも証明書をエクスポートできる機能が新たにできましたが、金額が結構高いので Amazon EC2 インスタンスに証明書を組み込むなら Let’s Encrypt 一択かなと思います。更新もスクリプト用意しておけば思ったより楽でしたし。
nginx も便利すぎます。とりあえず HTTPS 化、なら Let’s Encrypt と nginx だけでいいですね。
OAuth2 Proxy は神です。Amazon Cognito マネージドログインとの組み合わせ構成は私の中で標準化されました。w