
この記事は前編・中編・後編の3部構成です。
– 前編 : 事前調査と要件定義、設計、実装計画まで
– 中編(この記事) : 実装
– 後編 : 動作確認と修正
こんにちは、SCSKでテクニカルエスコートサービスを担当している兒玉です。
前回途中だった Spamhaus に登録されてしまったら通知する仕組みの実装を進めます。
本記事(中編)では、実装完了までを解説します。
タスクの確認
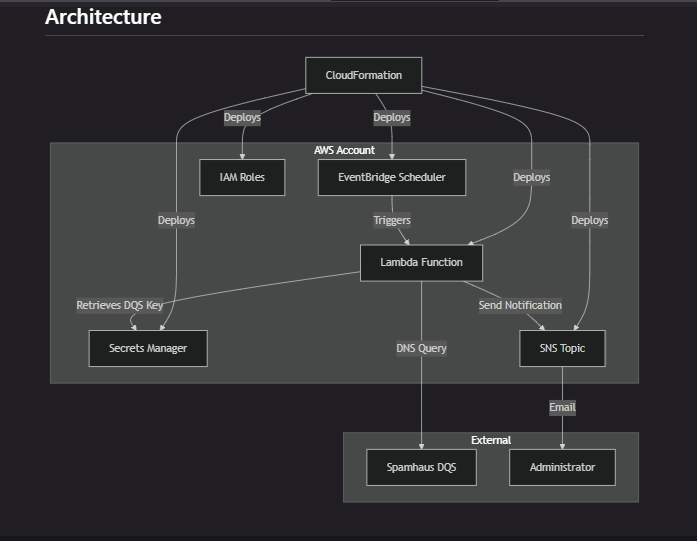
前回、設計ドキュメントとして作成したアーキテクチャ図です。こんな感じで考えていました。
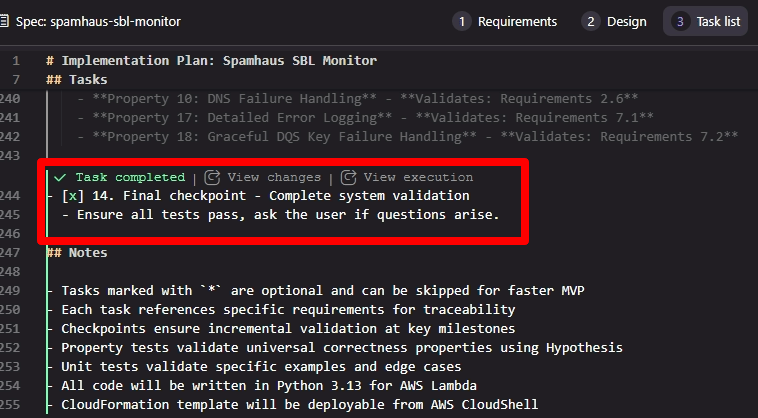
Kiro が作成してくれたタスクは大項目 14 項目、小項目も合わせると何と 56 項目あります。”*”のついている項目は optional で 21項目あるのでそれを引いても 35 項目もあるわけなので、テキパキと進めてゆきます。
- [ ] 1. Set up project structure and core interfaces
- [ ] 2. Implement DNS query and SBL checking functionality
  - [ ] 2.1 Implement DNS query module with nslookup functionality
  - [ ]* 2.2 Write property test for DNS query format compliance
  - [ ] 2.3 Implement SBL response interpretation
  - [ ]* 2.4 Write property test for DNS response interpretation
- [ ] 3. Implement AWS Secrets Manager integration
  - [ ] 3.1 Create DQS key retrieval module
  - [ ]* 3.2 Write property test for secure DQS key retrieval
  - [ ]* 3.3 Write unit tests for Secrets Manager error handling
- [ ] 4. Implement IP address processing and monitoring logic
  - [ ] 4.1 Create IP configuration parser
  - [ ]* 4.2 Write property test for IP configuration storage
  - [ ] 4.3 Implement sequential IP processing with timing
  - [ ]* 4.4 Write property test for sequential processing with timing
  - [ ]* 4.5 Write property test for complete IP monitoring
- [ ] 5. Checkpoint - Core functionality validation
- [ ] 6. Implement SNS notification system
  - [ ] 6.1 Create notification message formatter
  - [ ]* 6.2 Write property test for comprehensive notification content
  - [ ] 6.3 Implement SNS publishing with error handling
  - [ ]* 6.4 Write property test for SBL detection notification
  - [ ]* 6.5 Write property test for SNS failure resilience
- [ ] 7. Implement duplicate detection prevention
  - [ ] 7.1 Create SBL detection state management
  - [ ]* 7.2 Write property test for duplicate detection prevention
  - [ ]* 7.3 Write property test for notification consolidation
- [ ] 8. Implement comprehensive error handling and logging
  - [ ] 8.1 Create structured logging system
  - [ ]* 8.2 Write property test for structured logging with context
  - [ ] 8.3 Implement rate limiting and retry logic
  - [ ]* 8.4 Write property test for rate limiting handling
  - [ ]* 8.5 Write property test for sensitive information protection
- [ ] 9. Create main Lambda handler
  - [ ] 9.1 Implement main lambda_handler function
  - [ ]* 9.2 Write property test for SBL detection recording
  - [ ]* 9.3 Write integration tests for complete workflow
- [ ] 10. Checkpoint - Lambda function validation
- [ ] 11. Create CloudFormation template
  - [ ] 11.1 Create base CloudFormation template structure
  - [ ] 11.2 Define Lambda function resources
  - [ ] 11.3 Define EventBridge scheduler resources
  - [ ] 11.4 Define SNS topic and subscription resources
  - [ ] 11.5 Define Secrets Manager resources
  - [ ] 11.6 Define IAM roles and policies
  - [ ] 11.7 Implement resource tagging and naming
- [ ] 12. Create deployment scripts and documentation
  - [ ] 12.1 Create CloudShell deployment script
  - [ ]* 12.2 Write deployment validation tests
  - [ ] 12.3 Create deployment documentation
- [ ] 13. Final integration and validation
  - [ ] 13.1 Deploy and test complete system
  - [ ]* 13.2 Write property tests for configurable scheduling
  - [ ]* 13.3 Write property tests for execution failure resilience
  - [ ]* 13.4 Write remaining property tests
- [ ] 14. Final checkpoint - Complete system validation
Keep optional tasks(faster MVP) を使ってとにかく一通り作ってしまうことにします。
Kiroの左上の Explorer アイコン → .kiro/specs/<プロジェクト名>/task.md をクリックして tasks.md を開きます。
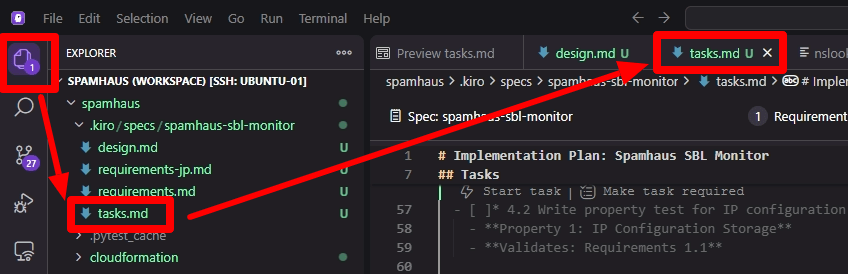
タスクリストが表示されます。
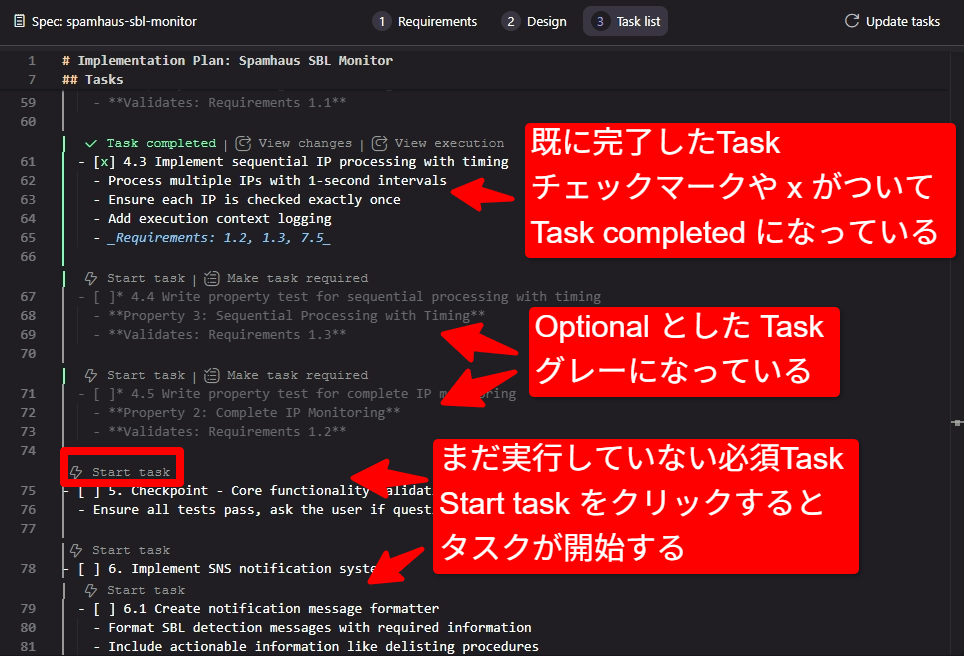
既に完了したタスクは チェックマークと、Task completed表示、Optionalのタスクは グレー表示、まだ実行していないTaskは 白表示されています。
各タスクの左上の ⚡️ Start task をクリックするとタスクが開始します。
タスクを進めていると、Kiro からコマンド実行の許可を求められるので、問題のないコマンドかどうか確認しながら許可を与えてゆきます。一つ一つのタスクは小さくとも、数が多いとなかなか終わりません。疲れをしらない生成AIに対して実行の様子を見ながら許可を与えたり何度も同じ処理を行うような状態で詰まってしまった場合にアドバイスをしたりするこちらのほうがへばってきてしまうくらいです。
Kiro と格闘すること 6 時間、ようやくコアタスクがすべて終了しました。タスクを進める中で気づいたコツは、Kiroの提案を鵜呑みにしすぎないことです。
詰まってしまった場合には、以下のような具体的な指示を出すのが早期解決の近道でした:
-
「状況が詳細にわかるようにデバッグ文を追加してください」
-
「このエラーの原因を掴めそうな調査処理を追加してください」
まさに、AIを「部下」として適切にリードする感覚ですね。
README.mdのアップデート
タスクによる作業中に、詳細なコマンドの実行パラメータ等が定義されたり、不具合で修正されたり、途中仕様変更でパラメータ追加が必要となったりで、当初に作成したドキュメントとは違った形になっていることもありますので、 README.md を現在の形にアップデートするように Kiro にお願いします。
これで、環境にデプロイする準備が整いました。
デプロイ
コードは書き上がって、単体、結合テストも成功したものの、実際に動作するかは別です。
これだけ丁寧に検討してタスクを分けても実環境で動作を確認しているわけではないのでどうしても不具合は発生してしまいます。
更新された README.md ファイルを元にデプロイします。
- 環境変数または引数にパラメータを入れて、 ./deploy.sh を実行
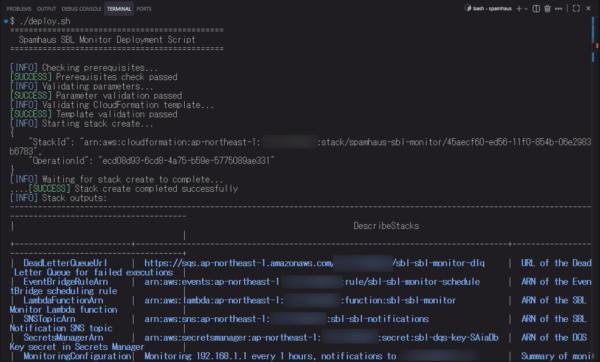
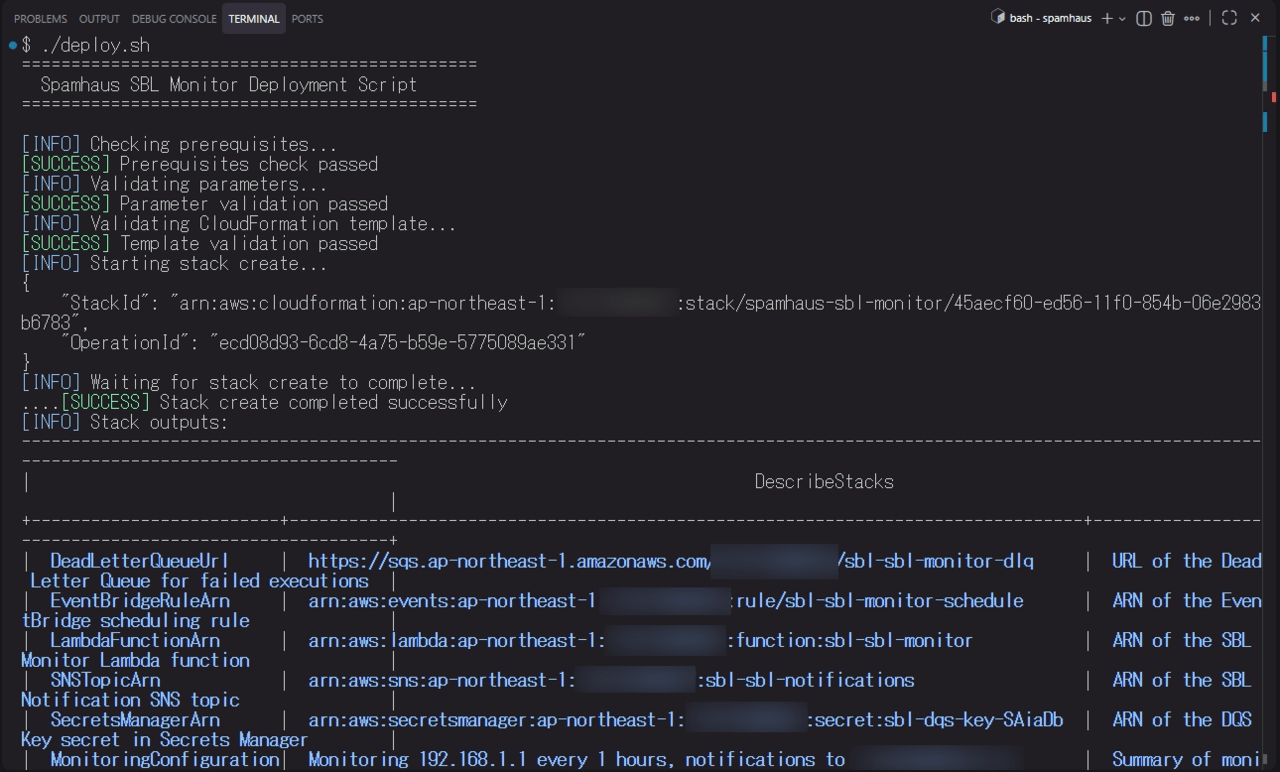

成功しました!
実行時のログを見ると、(スクリーンショットでは途中切れていますが)必要なリソースはデプロイされたように見えます。
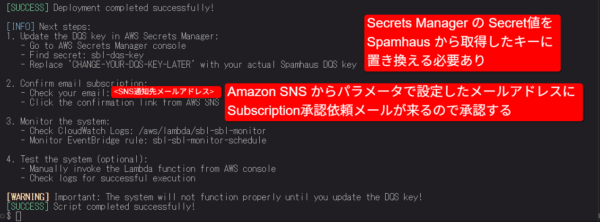
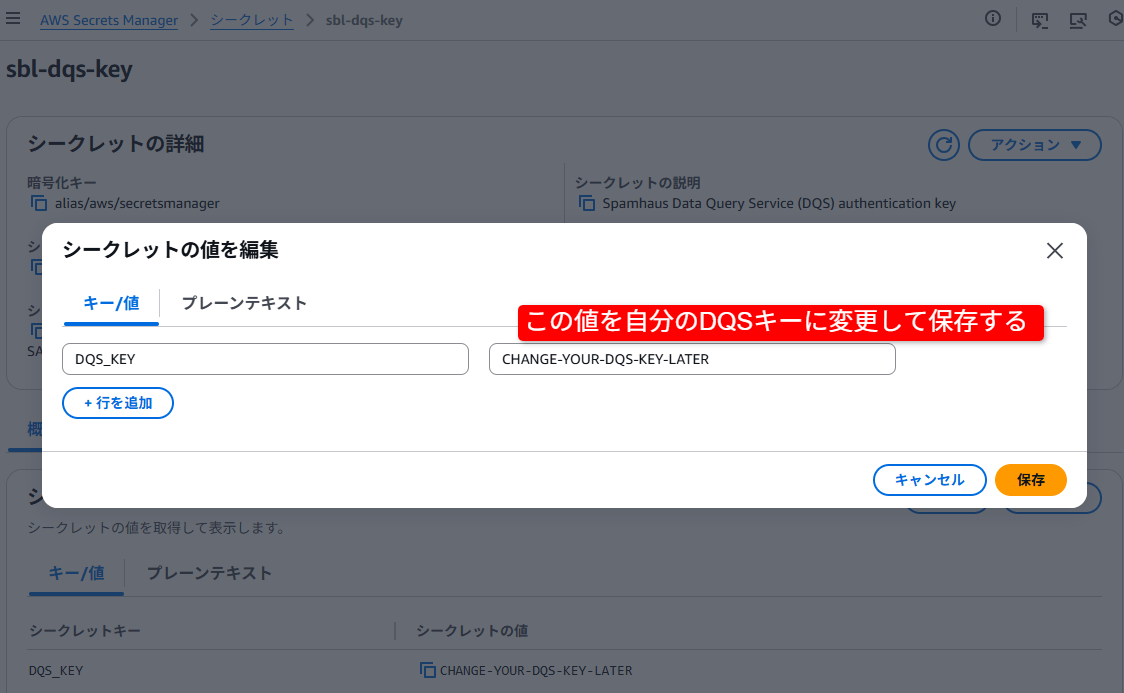
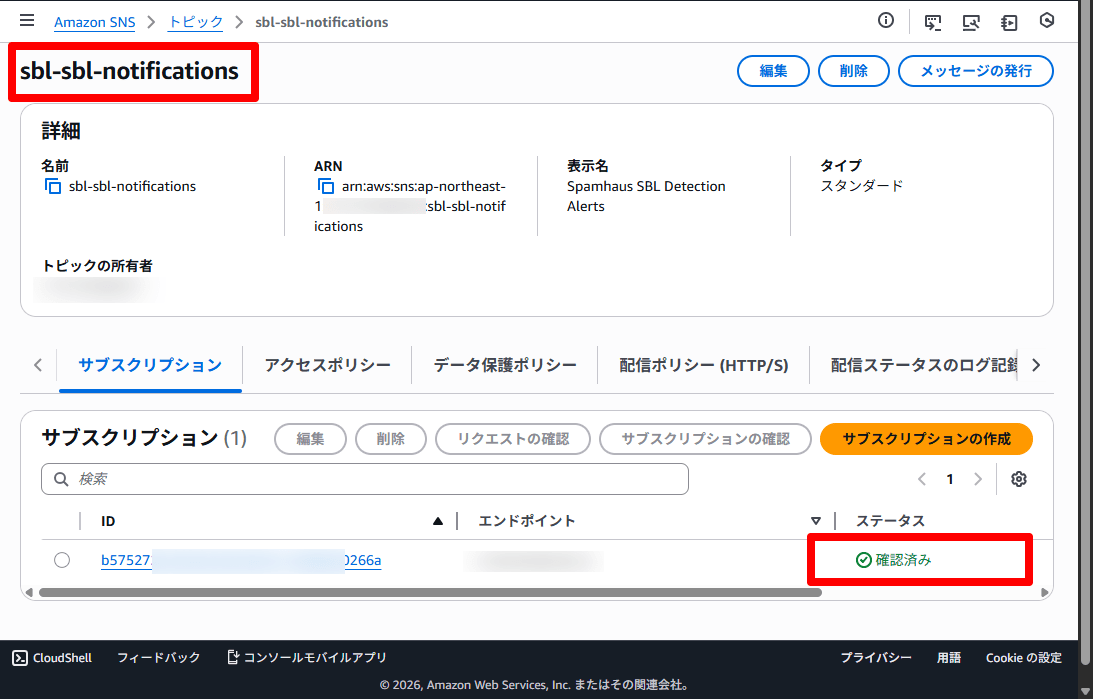
スクリプトの指示に従って、Secrets Manager の キーと、SNSのSubsctiptionの承認を行います。
- Secrets Manager の Secret 値を Spamhaus から取得したキーに置き換える
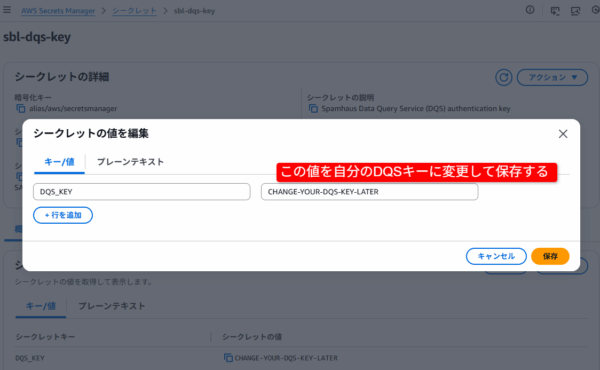
- メールを確認して Subscriptionを承認する
- サブスクリプションのステータスが “確認済み” になればOK
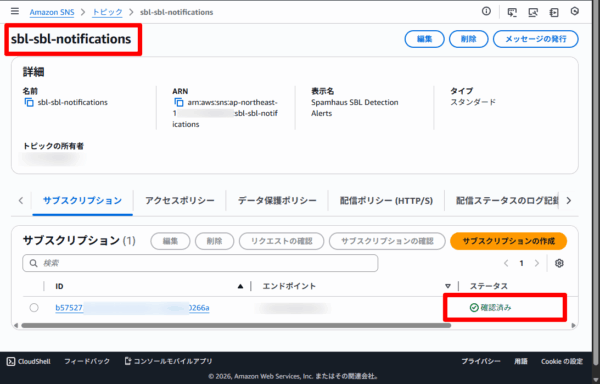
- サブスクリプションのステータスが “確認済み” になればOK
これで準備完了です。
今回はここまで。
後編では、動作確認と修正を行います。 [後編へ]