

こんにちは、広野です。
React アプリから Amazon DynamoDB のデータを取得するのはよくある実装パターンですが、JSON データのテキストファイルを直接読み込みたいこともあります。
例えば、
- あまり変更することのないマスタデータ的なもの
- バックグラウンドで分析処理をした結果、生成されたデータ
- Amazon DynamoDB の迅速な応答時間すら待てないぐらい急ぎ欲しい固定データ
- データ量はあまり多くない
こんな要件が 1 つまたは複数当てはまるときに、Amazon S3 に JSON データを配置して、かつ応答時間重視であれば Amazon CloudFront のエッジロケーションへのキャッシングも併用してそこから読み込ませる構成が 1 つの解になります。
ということから、以下の構成を考えてみました。
実現方法
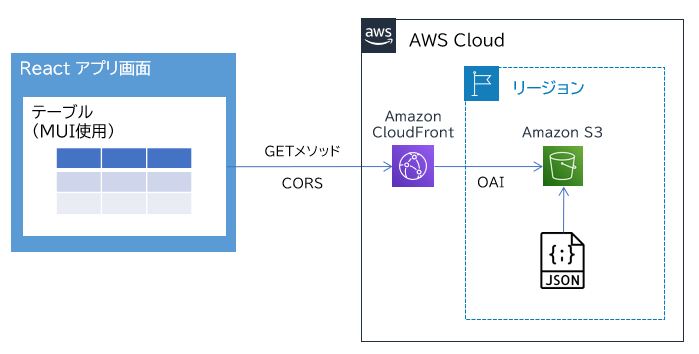
- Amazon S3 バケットに JSON データを記述したテキストファイルを配置する。
- Amazon S3 バケット内のファイルは Amazon CloudFront 経由で配信する。要 OAC (旧 OAI)。
- Amazon S3 バケット内のオブジェクトに対して GET メソッドでアクセスさせることが可能なため、その機能を利用してファイル内の JSON データを React アプリが取得する。CORS の設定が必要。
- 取得した JSON データを、MUI で作成したテーブルに渡して表示させる。
設定解説
Amazon S3
Amazon S3 バケットには、以下の JSON データが記述されたテキストファイルを配置します。
このデータをアプリ画面のテーブルで表示します。
- testdata.json
[
  { "menu": "menu1", "id": 1, "neta": "いか" },
  { "menu": "menu1", "id": 2, "neta": "たこ" },
  { "menu": "menu2", "id": 1, "neta": "海鮮丼" }
]
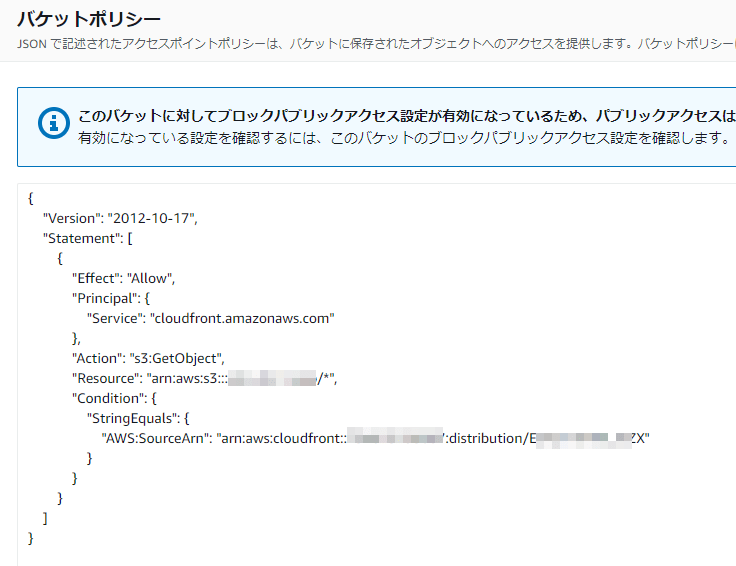
Amazon S3 には、大きく分けて 2 つのセキュリティ設定をします。
- OAC 用のバケットポリシー
- CORS
OAC は、指定した Amazon CloudFront 経由のアクセスでなければ拒否する設定です。
これは鉄板ソリューションなので、ネット上に情報が多々あります。以下、AWS 公式ブログでの紹介です。

実際にはこんな感じの設定になります。
CORS は、アクセス元サイトのドメイン名がアクセス先と異なる場合にアクセス許可をかける設定です。アプリのドメイン名と S3 にアクセスするための Amazon CloudFront のドメイン名は異なるので、この設定がないとアクセス拒否されます。
以下、AWS 公式ドキュメントの説明です。

実際にはこんな感じの設定になります。アクセスを許可するアプリのドメイン名はここでは AWS Amplify で自動的につくられたドメイン名にしています。

Amazon CloudFront
Amazon CloudFront の設定は非常に多いので、細かい説明は省略します。本記事の最後に添付する AWS CloudFormation テンプレートを読み込むか、それを実行してプロビジョニングされたリソースを見て頂けたらと思います。
OAC の設定は決まりきった設定なのでそんなにハマらないと思うのですが、CORS は HTTP ヘッダーの細かい設定がややこしくて、丁寧に設定しないとハマります。私はこのめんどくさい設定を手でするのが嫌なので、AWS CloudFormation で過去の設定をコピペしてリソースをつくっています。
React アプリ
実際に表示してみたテーブルはこちら。
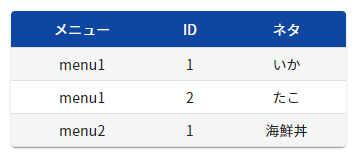
単純に Amazon S3 に配置した testdata.json の中身を GET メソッドで取得して、あらかじめ用意したテーブルにデータをマッピングしているだけのコードになります。
テーブルやレイアウト調整関連の WEB パーツは MUI を使用しています。テーブルのデザインをデフォルトのままではなく、カスタマイズしてみたサンプルになっています。
その他の細かい画面デザイン周りのコードは、皆さまのアプリコードに合わせて変更が必要です。
- App.js
import React, {useState, useEffect} from 'react';
import axios from 'axios';
import Grid from '@mui/material/Grid';
import Stack from '@mui/material/Stack';
import { styled } from '@mui/material/styles';
import Paper from '@mui/material/Paper';
import Table from '@mui/material/Table';
import TableBody from '@mui/material/TableBody';
import TableCell, { tableCellClasses } from '@mui/material/TableCell';
import TableContainer from '@mui/material/TableContainer';
import TableHead from '@mui/material/TableHead';
import TableRow from '@mui/material/TableRow';
import { blue } from '@mui/material/colors';

const App = () => {
  //テーブルデザイン設定
  const StyledTableCell = styled(TableCell)(({ theme }) => ({
    [`&.${tableCellClasses.head}`]: {
      backgroundColor: blue[900],
      color: theme.palette.common.white,
      fontSize: 14,
      fontFamily: "inherit"
    },
    [`&.${tableCellClasses.body}`]: {
      fontSize: 14,
      fontFamily: "inherit"
    }
  }));
  const StyledTableRow = styled(TableRow)(({ theme }) => ({
    '&:nth-of-type(odd)': {
      backgroundColor: theme.palette.action.hover
    }
  }));

  //state初期化
  const [jsonData, setJsonData] = useState([]);

  //データ取得関数
  const getJsonData = async () => {
    const res = await axios.get("https://xxxxxxxxxxxxxx.cloudfront.net/data/testdata.json");
    setJsonData(res.data);
  };

  //画面表示時にデータ取得
  useEffect(() => {
    getJsonData();
  }, []);

  return (
    <div id="page-wrapper">
      {/* Main */}
      <div id="main">
        <div className="container">
          <div className="row main-row">
            <div className="col-12 col-12-medium col-12-small">
              <section>
                <Grid container spacing={{ xs: 2, sm: 2, md: 2 }}>
                  <Grid item xs={12} sm={12} md={6}>
                    <Stack direction="column" justifyContent="flex-start" alignItems="center" spacing={2}>
                      <TableContainer component={Paper}>
                        <Table size="small" aria-label="testdata">
                          <TableHead>
                            <TableRow>
                              <StyledTableCell align="center">メニュー</StyledTableCell>
                              <StyledTableCell align="center">ID</StyledTableCell>
                              <StyledTableCell align="center">ネタ</StyledTableCell>
                            </TableRow>
                          </TableHead>
                          <TableBody>
                            {jsonData.map((row) => (
                              <StyledTableRow>
                                <StyledTableCell align="center">{row.menu}</StyledTableCell>
                                <StyledTableCell align="center">{row.id}</StyledTableCell>
                                <StyledTableCell align="center">{row.neta}</StyledTableCell>
                              </StyledTableRow>
                            ))}
                          </TableBody>
                        </Table>
                      </TableContainer>
                    </Stack>
                  </Grid>
                </Grid>
              </section>
            </div>
          </div>
        </div>
      </div>
    </div>
  );
};

export default App;
AWS CloudFormation テンプレート
本記事で紹介した Amazon S3 バケットと Amazon CloudFront を構築してくれる Amazon CloudFormation テンプレートを貼り付けておきます。
パラメータに設定するドメイン名は、アプリのドメイン名になります。CORS の設定で使われます。
AWSTemplateFormatVersion: 2010-09-09
Description: The CloudFormation template that creates a S3 bucket and a CloudFront distribution.

# ------------------------------------------------------------#
# Input Parameters
# ------------------------------------------------------------#
Parameters:
  SystemName:
    Type: String
    Description: System name.
    Default: xxxxx
    MaxLength: 10
    MinLength: 1

  DomainName:
    Type: String
    Description: Domain name for URL.
    Default: example.com
    MaxLength: 40
    MinLength: 5

  SubDomainName:
    Type: String
    Description: Sub domain name for URL.
    Default: xxxxx
    MaxLength: 40
    MinLength: 1

Resources:
# ------------------------------------------------------------#
# S3
# ------------------------------------------------------------#
  S3Bucket:
    Type: AWS::S3::Bucket
    Properties:
      BucketName: !Sub example-${SystemName}-img
      PublicAccessBlockConfiguration:
        BlockPublicAcls: true
        BlockPublicPolicy: true
        IgnorePublicAcls: true
        RestrictPublicBuckets: true
      CorsConfiguration:
        CorsRules:
          - AllowedHeaders:
              - "*"
            AllowedMethods:
              - "GET"
              - "HEAD"
            AllowedOrigins:
              - !Sub https://${SubDomainName}.${DomainName}
      Tags:
        - Key: Cost
          Value: !Sub example-${SystemName}
  S3BucketPolicy:
    Type: AWS::S3::BucketPolicy
    Properties:
      Bucket: !Ref S3Bucket
      PolicyDocument:
        Version: "2012-10-17"
        Statement:
          - Action:
              - "s3:GetObject"
            Effect: Allow
            Resource: !Sub "arn:aws:s3:::${S3Bucket}/*"
            Principal:
              Service: cloudfront.amazonaws.com
            Condition:
              StringEquals:
                AWS:SourceArn: !Sub arn:aws:cloudfront::${AWS::AccountId}:distribution/${CloudFrontDistribution}

# ------------------------------------------------------------#
# CloudFront
# ------------------------------------------------------------#
  CloudFrontDistribution:
    Type: AWS::CloudFront::Distribution
    Properties:
      DistributionConfig:
        Enabled: true
        Comment: !Sub CloudFront distribution for example-${SystemName}-img
        HttpVersion: http2
        IPV6Enabled: true
        PriceClass: PriceClass_200
        DefaultCacheBehavior:
          TargetOriginId: !Sub S3Origin-${SystemName}-img
          ViewerProtocolPolicy: redirect-to-https
          AllowedMethods:
            - GET
            - HEAD
            - OPTIONS
          CachedMethods:
            - GET
            - HEAD
          CachePolicyId: !Ref CloudFrontCachePolicy
          OriginRequestPolicyId: !Ref CloudFrontOriginRequestPolicy
          ResponseHeadersPolicyId: !Ref CloudFrontResponseHeadersPolicy
          Compress: true
          SmoothStreaming: false
        Origins:
          - Id: !Sub S3Origin-${SystemName}-img
            DomainName: !Sub ${S3Bucket}.s3.${AWS::Region}.amazonaws.com
            S3OriginConfig:
              OriginAccessIdentity: ""
            OriginAccessControlId: !GetAtt CloudFrontOriginAccessControl.Id
            ConnectionAttempts: 3
            ConnectionTimeout: 10
        ViewerCertificate:
          CloudFrontDefaultCertificate: true
      Tags:
        - Key: Cost
          Value: !Sub example-${SystemName}
  CloudFrontOriginAccessControl:
    Type: AWS::CloudFront::OriginAccessControl
    Properties:
      OriginAccessControlConfig:
        Description: !Sub CloudFront OAC for example-${SystemName}-img
        Name: !Sub OriginAccessControl-example-${SystemName}-img
        OriginAccessControlOriginType: s3
        SigningBehavior: always
        SigningProtocol: sigv4
  CloudFrontCachePolicy:
    Type: AWS::CloudFront::CachePolicy
    Properties:
      CachePolicyConfig:
        Name: !Sub CachePolicy-${SystemName}-img
        Comment: !Sub CloudFront Cache Policy for example-${SystemName}-img
        DefaultTTL: 3600
        MaxTTL: 86400
        MinTTL: 60
        ParametersInCacheKeyAndForwardedToOrigin:
          CookiesConfig:
            CookieBehavior: none
          EnableAcceptEncodingBrotli: true
          EnableAcceptEncodingGzip: true
          HeadersConfig:
            HeaderBehavior: whitelist
            Headers:
              - Access-Control-Request-Headers
              - Access-Control-Request-Method
              - Origin
          QueryStringsConfig:
            QueryStringBehavior: none
  CloudFrontOriginRequestPolicy:
    Type: AWS::CloudFront::OriginRequestPolicy
    Properties:
      OriginRequestPolicyConfig:
        Name: !Sub OriginRequestPolicy-${SystemName}-img
        Comment: !Sub CloudFront Origin Request Policy for example-${SystemName}-img
        CookiesConfig:
          CookieBehavior: none
        HeadersConfig:
          HeaderBehavior: whitelist
          Headers:
            - Access-Control-Request-Headers
            - Access-Control-Request-Method
            - Origin
        QueryStringsConfig:
          QueryStringBehavior: none
  CloudFrontResponseHeadersPolicy:
    Type: AWS::CloudFront::ResponseHeadersPolicy
    Properties:
      ResponseHeadersPolicyConfig:
        Name: !Sub ResponseHeadersPolicy-${SystemName}-img
        Comment: !Sub CloudFront Response Headers Policy for example-${SystemName}-img
        CorsConfig:
          AccessControlAllowCredentials: false
          AccessControlAllowHeaders:
            Items:
              - "*"
          AccessControlAllowMethods:
            Items:
              - GET
              - HEAD
              - OPTIONS
          AccessControlAllowOrigins:
            Items:
              - !Sub https://${SubDomainName}.${DomainName}
          AccessControlExposeHeaders:
            Items:
              - "*"
          AccessControlMaxAgeSec: 600
          OriginOverride: true
        SecurityHeadersConfig:
          ContentTypeOptions:
            Override: true
          FrameOptions:
            FrameOption: SAMEORIGIN
            Override: true
          ReferrerPolicy:
            Override: true
            ReferrerPolicy: strict-origin-when-cross-origin
          StrictTransportSecurity:
            AccessControlMaxAgeSec: 31536000
            IncludeSubdomains: true
            Override: true
            Preload: true
          XSSProtection:
            ModeBlock: true
            Override: true
            Protection: true

# ------------------------------------------------------------#
# Output Parameters
# ------------------------------------------------------------#
Outputs:
#S3
  ImgBucketName:
    Value: !Ref S3Bucket
#CloudFront
  CloudFrontOriginalDomain:
    Value: !GetAtt CloudFrontDistribution.DomainName
まとめ
いかがでしたでしょうか?
Amazon S3 に配置した JSON データをアプリから直接取得することができました。静的データという制約はありますが、ちょっとしたデータであれば Amazon DynamoDB 代わりに使えます。
本記事が皆様のお役に立てれば幸いです。